Project Configurations for Android 🛠️

Gradle configuration
- Gradle should be the default option for the build system.
- Although Gradle offers a large degree of flexibility in the project structure, unless developers have a compelling reason to do otherwise, they should accept its default structure as this simplify the build scripts.
- Choose either way to build a signed Release APK:
- AS Menu -> Build -> Generate Signed APK -> Manually adding the keystore directory/passwords -> Build.
-
Gradle configuration for Signing APK:
// Put this in the app module level gradle:
signingConfigs {
    release {
        try {
            storeFile file("myapp.keystore")
            storePassword KEYSTORE_PASSWORD
            keyAlias "thekey"
            keyPassword KEY_PASSWORD
        }
        catch (ex) {
            throw new InvalidUserDataException("Define KEYSTORE_PASSWORD and KEY_PASSWORD in gradle.properties.")
        }
    }
}

// And create another `gradle.properties` file to keep the password, don't PUSH this to the repo.
KEYSTORE_PASSWORD=real_keystore_password
KEY_PASSWORD=real_key_passw
-
Don’t ever expose the key secrets like this:
  // Don't do this
  signingConfigs {
      release {
          storeFile file("myapp.keystore")
          storePassword "storepassword"
          keyAlias "thekey"
          keyPassword "nicepassword"
      }
  }
Gradle configuration for app flavors
The purpose is to separate the Develop environment (endpoints, library keys…) with the real Production environment. To achieve this:
-
First, define the flavor in app level gradle config:
productFlavors { production { applicationId "com.app.android" } staging { // Staging AppId should be different from the real production. applicationId "com.app.staging" } } sourceSets { staging { res.srcDirs = ['src/staging/res'] } // production doesn't need to clarify the resource directory as it uses the default main one. } -
Second, create a proper
stagingdirectory for the staging resources (endpoints, different keys…):│ │ ├─ main │ │ │ ├─ java │ │ │ └─ res │ │ │ ├─ anim │ │ │ ├─ color │ │ │ ├─ drawable │ │ │ ├─ layout │ │ │ └─ values │ │ │ │ │ │ │ │ └─ staging │ │ └─ res │ │ ├─ anim │ │ ├─ color │ │ ├─ drawable │ │ ├─ layout │ │ └─ values
ABI filter
- The ABI defines, with great precision, how an application’s machine code is supposed to interact with the system at runtime. An ABI for each CPU architecture that the app work with must be specified. Applying an incorrect ABI choice on a mismatched CPU architecture won’t make it work. For example, an
x86 emulatorrequires to use the properx86APK. - Below is a simple example of splitting the app into two different flavors (check out this article for more details):
-
production_x86for x86 chipset. -
productionfor armeabi, armeabi-v7a chipset.
// Adding this to the app module level gradle: production_x86 { // Append automatically a different code version to identify the different version when app is published and observe the tracking info. versionCode Integer.parseInt("6" + defaultConfig.versionCode) applicationId "com.redplanet.android" ndk { abiFilters "x86" } } production { applicationId "com.redplanet.android" ndk { abiFilters "armeabi", "armeabi-v7a" } } // Don't forget to bring the proper native library files (.so) to the main/jniLibs/ -
- Some Gradle tips would be helpful.
Proguard
Proguard is used to shrink and obfuscate the packaged code in the release build. It saves users time in downloading, hence increasing the app download rates.
buildTypes {
    debug {
        minifyEnabled false
    }
    release {
        signingConfig signingConfigs.release
        minifyEnabled true
        proguardFiles getDefaultProguardFile('proguard-android.txt'), 'proguard-rules.pro'
    }
}
Keystore for CI/CD
Create and configure a debug keystore when distributing the debug build, either via an automated CI/CD process, or a manual build process (building APK locally and sending it to PM/Tester).
Having a debug keystore removes a lot of issues for product managers, clients, and testers when installing a new (or old) build. Without it, the installation always requires uninstalling the existing version on the device to process. It happens to both Firebase App Distribution and manual installation.
-
To generate a debug key:
$ keytool -genkey -v -keystore debug.keystore -alias debug-key-alias -keyalg RSA -keysize 2048 -validity 10000 -
Then configure gradle for the debug flavor signing with the created key:
  signingConfigs {
      debug {
          keyAlias "debug-key-alias"
          keyPassword System.getEnv("DEBUG_KEYSTORE_PASSWORD")
          storeFile file("debug.keystore")
          storePassword System.getEnv("DEBUG_KEYSTORE_PASSWORD")
      }
      ...
  }

  buildTypes {
      debug {
          signingConfig signingConfigs.debug
      }
      ...
  }
Phrase Configuration
Phrase is a platform the team uses to collaborate between developers, product managers, and clients in terms of localization and translation management.
Phrase is useful as a Single Source of Truth. Once any translations are updated, they can be synced by pushing or pulling them with the repository through Phrase CLI.
Setting up the Phrase Client
For more information, refer to the Phrase CLI documentation.
-
Create a
.phrase.ymlconfiguration file by running:$ phrase init -
The following must be specified:
-
access token: it can be created from the Translation Center in the User profile’s settings: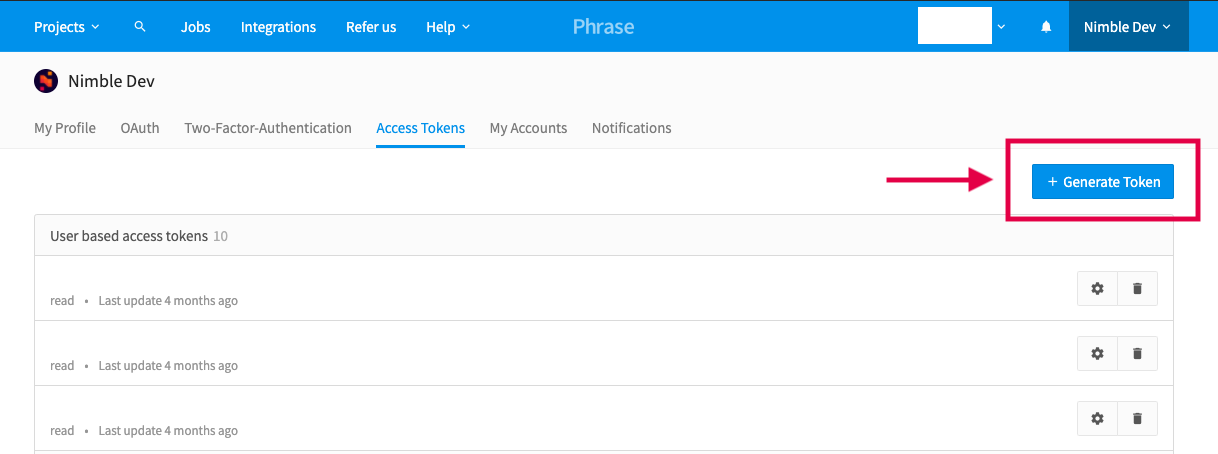
Phrase Access Token -
Phrase project ID: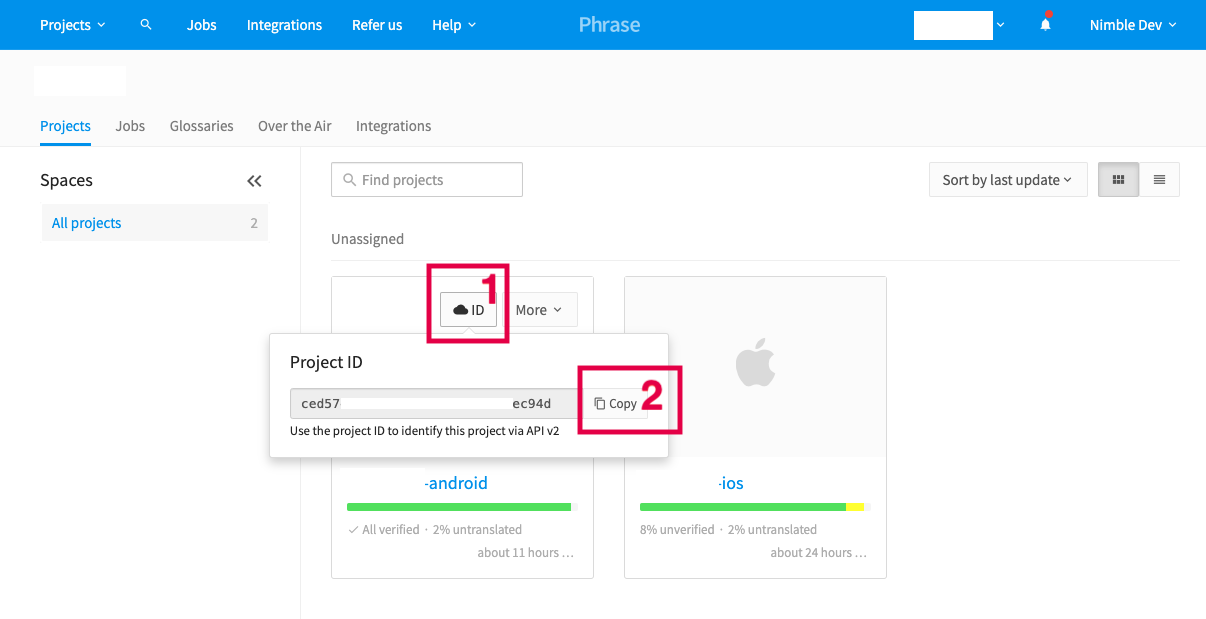
Phrase Project Id - A locale file format, for example:
values/strings.xmlvalues-th/strings.xml
- The location of the locale files inside the project’s codebase.
-
Using Phrase
-
To update locale files:
$ cd <your_project_directory> $ phrase pull -
To push new strings or update the values of existing strings:
$ cd <your_project_directory>
$ phrase push
To push updates automatically whenever opening a pull request, set up a CI pipeline:
name: Push strings to phrase on: pull_request: types: [ opened, edited, reopened ] branches-ignore: - 'release/**' - master jobs: push_strings_to_phrase: name: Push string to phrase runs-on: ubuntu-latest steps: - uses: actions/checkout@v1 - uses: winify-ag/setup-phraseapp@v2 with: version: 2.0.12 - run: phrase push --wait - name: Uploading log run: | echo If you have some removed or changed keys, please check on <your_upload_log_link> to remove the unwanted keys. -
To update only the string keys:
Phrase considers the updated key on the locale file as a new key. So in case of updating the string key, do it on the Phrase website.

Phrase Update String -
To remove some strings, there are 2 options:
-
Remove by Phrase CLI:
-
Pull the Phrase localization first.
-
Remove the target string from the locale file.
-
Push the locale file with the string removed or open the pull request (update via a CI pipeline).
-
Go to
https://app.phrase.com/accounts/<your_account>/projects/<your_project>/uploadsand select the latest upload log: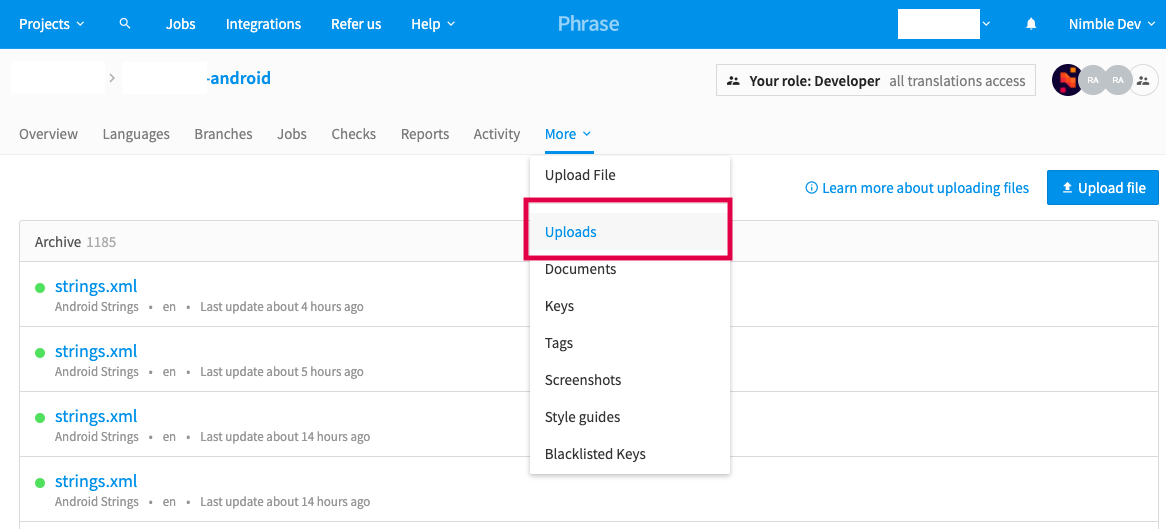
Phrase Upload Log -
Click the
Delete unmentioned keysbutton. There will be an unmentioned string list, which contains the strings that are in the Phrase but aren’t in the uploaded strings.xml:
Phrase Unmentioned Key -
Click the
Deletebutton: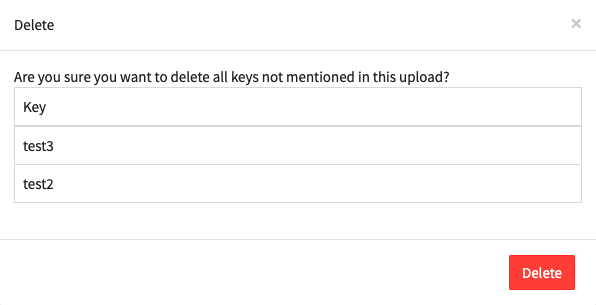
Phrase Delete Key
-
-
Remove on Phrase website:

Phrase Delete on Web
-