At Nimble, developers value continuous learning and often strive to incorporate the latest software development best practices into our projects. As a part of this effort, we explored various techniques for improving the manageability, scalability, and maintainability of iOS applications. This blog post shares our insights and experiences with modularizing iOS applications using Swift Package Manager and SwiftUI.
Why modularization
Modularization is a software development technique that involves breaking down a large project into smaller, more manageable modules. Each module is self-contained and can be developed, tested, and deployed separately. This approach has several benefits, including improved build times, the ability for teams to work on different modules autonomously, and faster iteration cycles.
Technical choices
While modularization is not new in the iOS development world, one of the existing approaches is to use Xcode Workspace. However, with the introduction of Swift Package Manager and SwiftUI, modularization has become even more accessible and manageable.
Swift Package Manager
Swift Package Manager (SPM) is a first-party tool from Apple that automates the process of managing package dependencies in Swift. It is integrated with the Swift build system and provides a straightforward way to specify dependencies using a Package.swift file.
With SPM, modularization gains several advantages over other methods:
- SPM simplifies the management of project dependencies. It handles versioning, downloading, and linking dependencies automatically, which makes it easier to manage complex projects.
- Since SPM is a first-party tool from Apple, this means it is well-supported and integrated with other Apple tools and technologies when implementing the modular architecture.
- The ecosystem provides many available SPM plugins that help implement modularization architecture more effectively (e.g., SwiftGen for generating localized strings, images, and colors per module).
SwiftUI
SwiftUI is Apple’s declarative UI framework for building applications across all of their platforms. This modern method streamlines the process of constructing user interfaces (UIs) by enabling developers to generate intricate and responsive UIs with lesser code.
There are several notable advantages to using SwiftUI for modularization:
- Embracing SwiftUI’s compositional nature allows developers to deconstruct complex user interfaces into smaller, reusable components efficiently. This enhances the maintainability and scalability of the codebase, simplifying the addition of new features and modifications to the UI. As a result, SwiftUI is an ideal choice for applications with a modular architecture.
- SwiftUI’s preview feature allows developers to view their UI in real time during development. By modularizing with SwiftUI, developers can examine the current module without building the entire application, significantly streamlining UI implementation changes. This results in considerable time and effort savings when adjusting the UI.
- Compared to UIKit, SwiftUI offers a more seamless development experience with reduced boilerplate code and user-friendly APIs. Additionally, the framework’s declarative syntax simplifies understanding the layout and behavior of the UI, regardless of the underlying architecture.
Modularization of an iOS application with SwiftUI and SPM
In the following section, we will delve into the process of modularizing iOS applications by employing both the Swift Package Manager (SPM) and SwiftUI. We will illustrate this technique through a demo application named the “CryptoPrices”.
Multi-modules application
In a multi-modules application, each module is designed with its own specific functionality, allowing the application to be organized into multiple discrete parts. These modules are typically designed with loosely coupled interfaces, enabling them to interact with each other in a flexible and maintainable way. To illustrate the benefits of modularization with SwiftUI and SPM, let’s take a closer look at the layout of the modules in the example application:
Screen modules:
The application assigns each module to a distinct screen within the presentation layer, which is responsible for managing both the UI and related behaviors. This organizational approach was chosen due to the application’s small scale, which includes only two screens. Arranging the modules by feature would have introduced unnecessary complexity in this particular instance, as each feature could encompass multiple screens.
As a result, the two main modules in the application are Home and MyCoin, each corresponding to their respective screens:
-
The
Homemodule is responsible for displaying a list of trending and user’s saved coins:
Home screen -
The
MyCoinmodule is responsible for displaying detailed information about a specific cryptocurrency: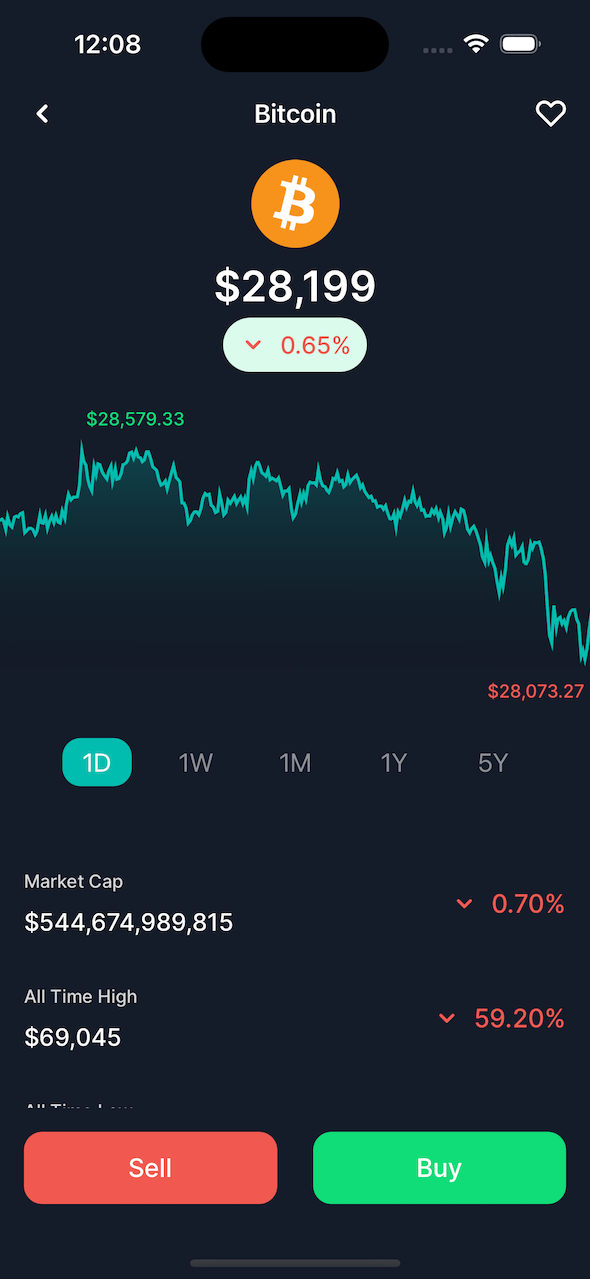
MyCoin screen
The Home and MyCoin modules are designed to remain independent from each other. In managing UIs and their associated behaviors, it is often necessary to utilize helper functions or utilities. This is where support modules come in.
Support modules:
BuildTools, TestHelper, and Stylesguide are the three main support modules that Home, MyCoin, and other modules rely on.
-
The
BuildToolsmodule includes a collection of tools and scripts that aid in generating mock interfaces while building and deploying the application:
BuildTools module -
The
TestHelpermodule contains utilities and helpers to support unit testing:
TestHelpers module -
The
Stylesguidemodule contains reusable styles and design components such as fonts, colors, button styles, etc., which are used across screen modules of the application: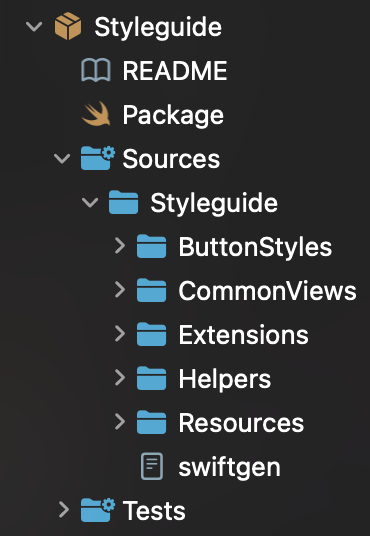
Styleguide module
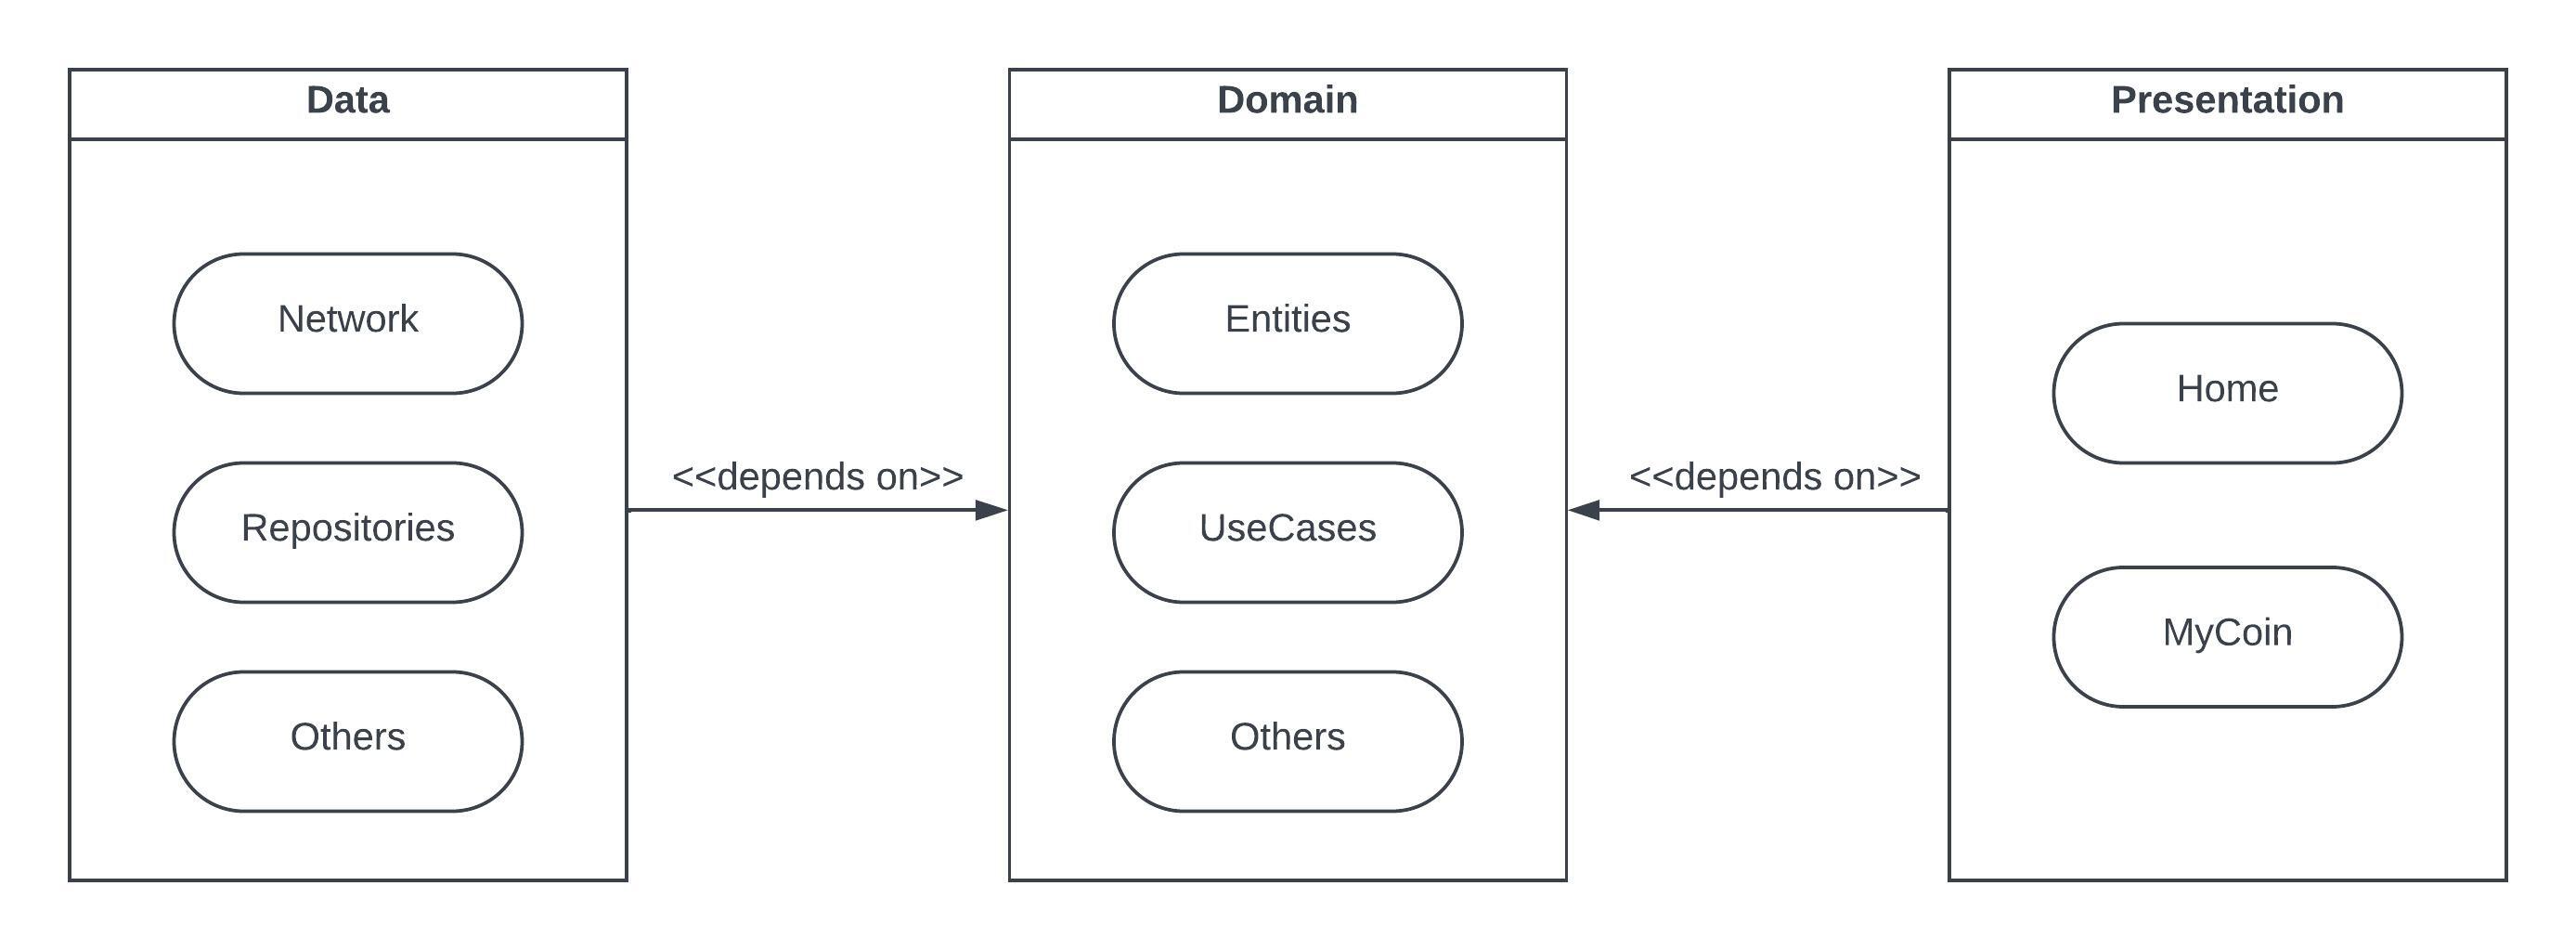
Layer modules (Data and Domain):
First, the Domain module contains the application’s core business logic, such as use cases, entities, etc. It defines the interfaces the other modules can use to interact with the app’s business logic:

Then, there is the Data module that is responsible for providing data to the app, implementing the interfaces defined in the Domain module, and interacting with external data sources such as APIs or databases, including data mapping and caching logic, etc.:

Inspired by the Clean Architecture, the image below illustrates the overall relationship between modules in this project. Indeed, each layer of the Clean Architecture shares similarities with the module relationships:
Package files:
The Package.swift file plays a crucial role in modularizing an application. Acting as the blueprint for each module, it specifies dependencies, targets, and various build settings. By ensuring well-defined package files for each module, developers can effectively maintain the application’s stability and scalability.
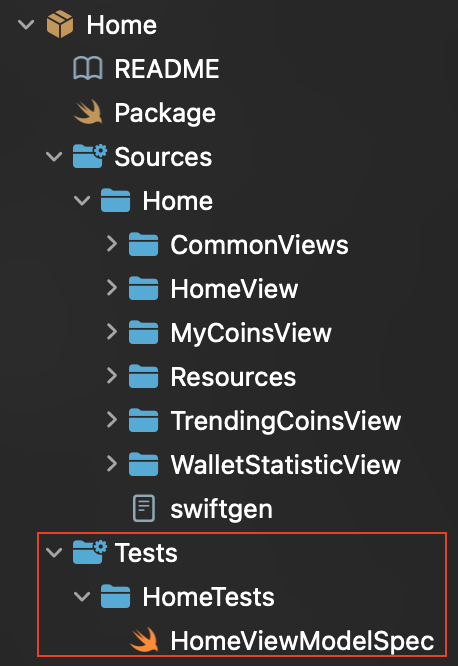
For example, the Home module contains a dedicated Package.swift file, which delineates its dependencies on other modules, such as the Domain module. This file also outlines the targets for the Home module, including the Home executable target and the HomeTests unit test target. Furthermore, the file encompasses an array of build settings, including compiler flags, build configurations, and more:
let package = Package(
    name: "Home",
    defaultLocalization: "en",
    platforms: [.iOS(.v15)],
    products: [
        .library(
            name: "Home",
            targets: ["Home"]
        )
    ],
    dependencies: [
        .package(name: "Styleguide", path: "../Styleguide"),
        .package(name: "Domain", path: "../Domain"),
        .package(name: "TestHelpers", path: "../TestHelpers"),
        .package(url: "https://github.com/Quick/Quick", from: "6.1.0"),
        .package(url: "https://github.com/Quick/Nimble", from: "11.2.1"),
        .package(url: "https://github.com/SwiftGen/SwiftGenPlugin", from: "6.6.2")
    ],
    targets: [
        .target(
            name: "Home",
            dependencies: [
                .product(name: "Styleguide", package: "Styleguide"),
                .product(name: "UseCaseProtocol", package: "Domain"),
                .product(name: "DomainTestHelpers", package: "Domain")
            ],
            plugins: [
                .plugin(name: "SwiftGenPlugin", package: "SwiftGenPlugin")
            ]
        ),
        .testTarget(
            name: "HomeTests",
            dependencies: [
                "Home",
                .product(name: "UseCaseProtocol", package: "Domain"),
                .product(name: "DomainTestHelpers", package: "Domain"),
                .product(name: "TestHelpers", package: "TestHelpers"),
                .product(name: "Quick", package: "Quick"),
                .product(name: "Nimble", package: "Nimble")
            ]
        )
    ]
)
Each module’s package file allows the module to be built and tested independently, which is a KEY advantage of modularization. It also simplifies managing dependencies since each module can specify its dependencies independently of others. This makes adding or removing dependencies as needed easier without affecting other parts of the application.
💡 It’s worth noting that a
Package.swiftfile is not a one-time configuration file but a living document requiring regular updates as the application evolves. Thus, it is essential to thoroughly test and review any changes made to this file to prevent unintended consequences or errors from arising.
Now that we have covered the fundamentals of setting up modules in an iOS application with SPM, let’s delve into how to transition from vertical to horizontal dependencies to enhance further the manageability, scalability, and maintainability of the application with modularization.
Vertical to horizontal dependencies transition
Scalability is crucial for any application. As the application grows, maintaining, testing, and adding new features can become increasingly challenging. One of the main reasons for this is vertical dependencies, where each application component depends on another component in a linear, top-down fashion.
When an application uses vertical dependencies, it can result in a complex and tightly-coupled codebase that is difficult to modify and test. To better illustrate this point, consider the following example of the application structured with vertical dependencies:
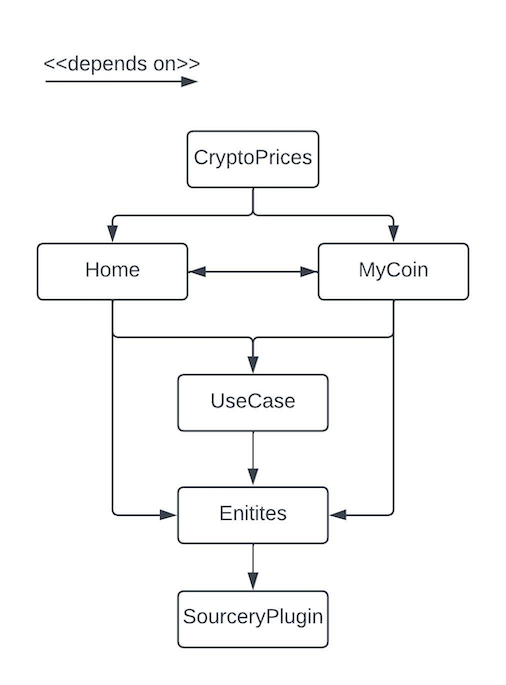
As module dependencies increase, modifying or adding features to an application becomes more complicated and can result in unintended side effects. Changes made to one module may impact many others, making bugs hard to identify and fix.
To address these issues, it’s essential to transition from vertical to horizontal dependencies by modularizing the application into smaller, independent modules. This allows for easier development and testing and helps to prevent unintended side effects from changes made to one module. This is where the interface/implementation module technique comes in.
Interface/Implementation module
One great technique for moving from vertical to horizontal dependencies is the interface/implementation module approach. It focuses on how to abstract an interface (API) from its implementation when modularizing an application, which can result in faster build times as changes primarily occur in the concrete implementation modules. In contrast, the more stable interface modules change less frequently. With this method, developers can focus on referencing a module’s functionality without explicit dependencies. Thus, it simplifies the dependency graph, reduces cross-module dependencies, and controls build times.
First, let’s look at this architecture diagram of the CryptoPrices iOS application:
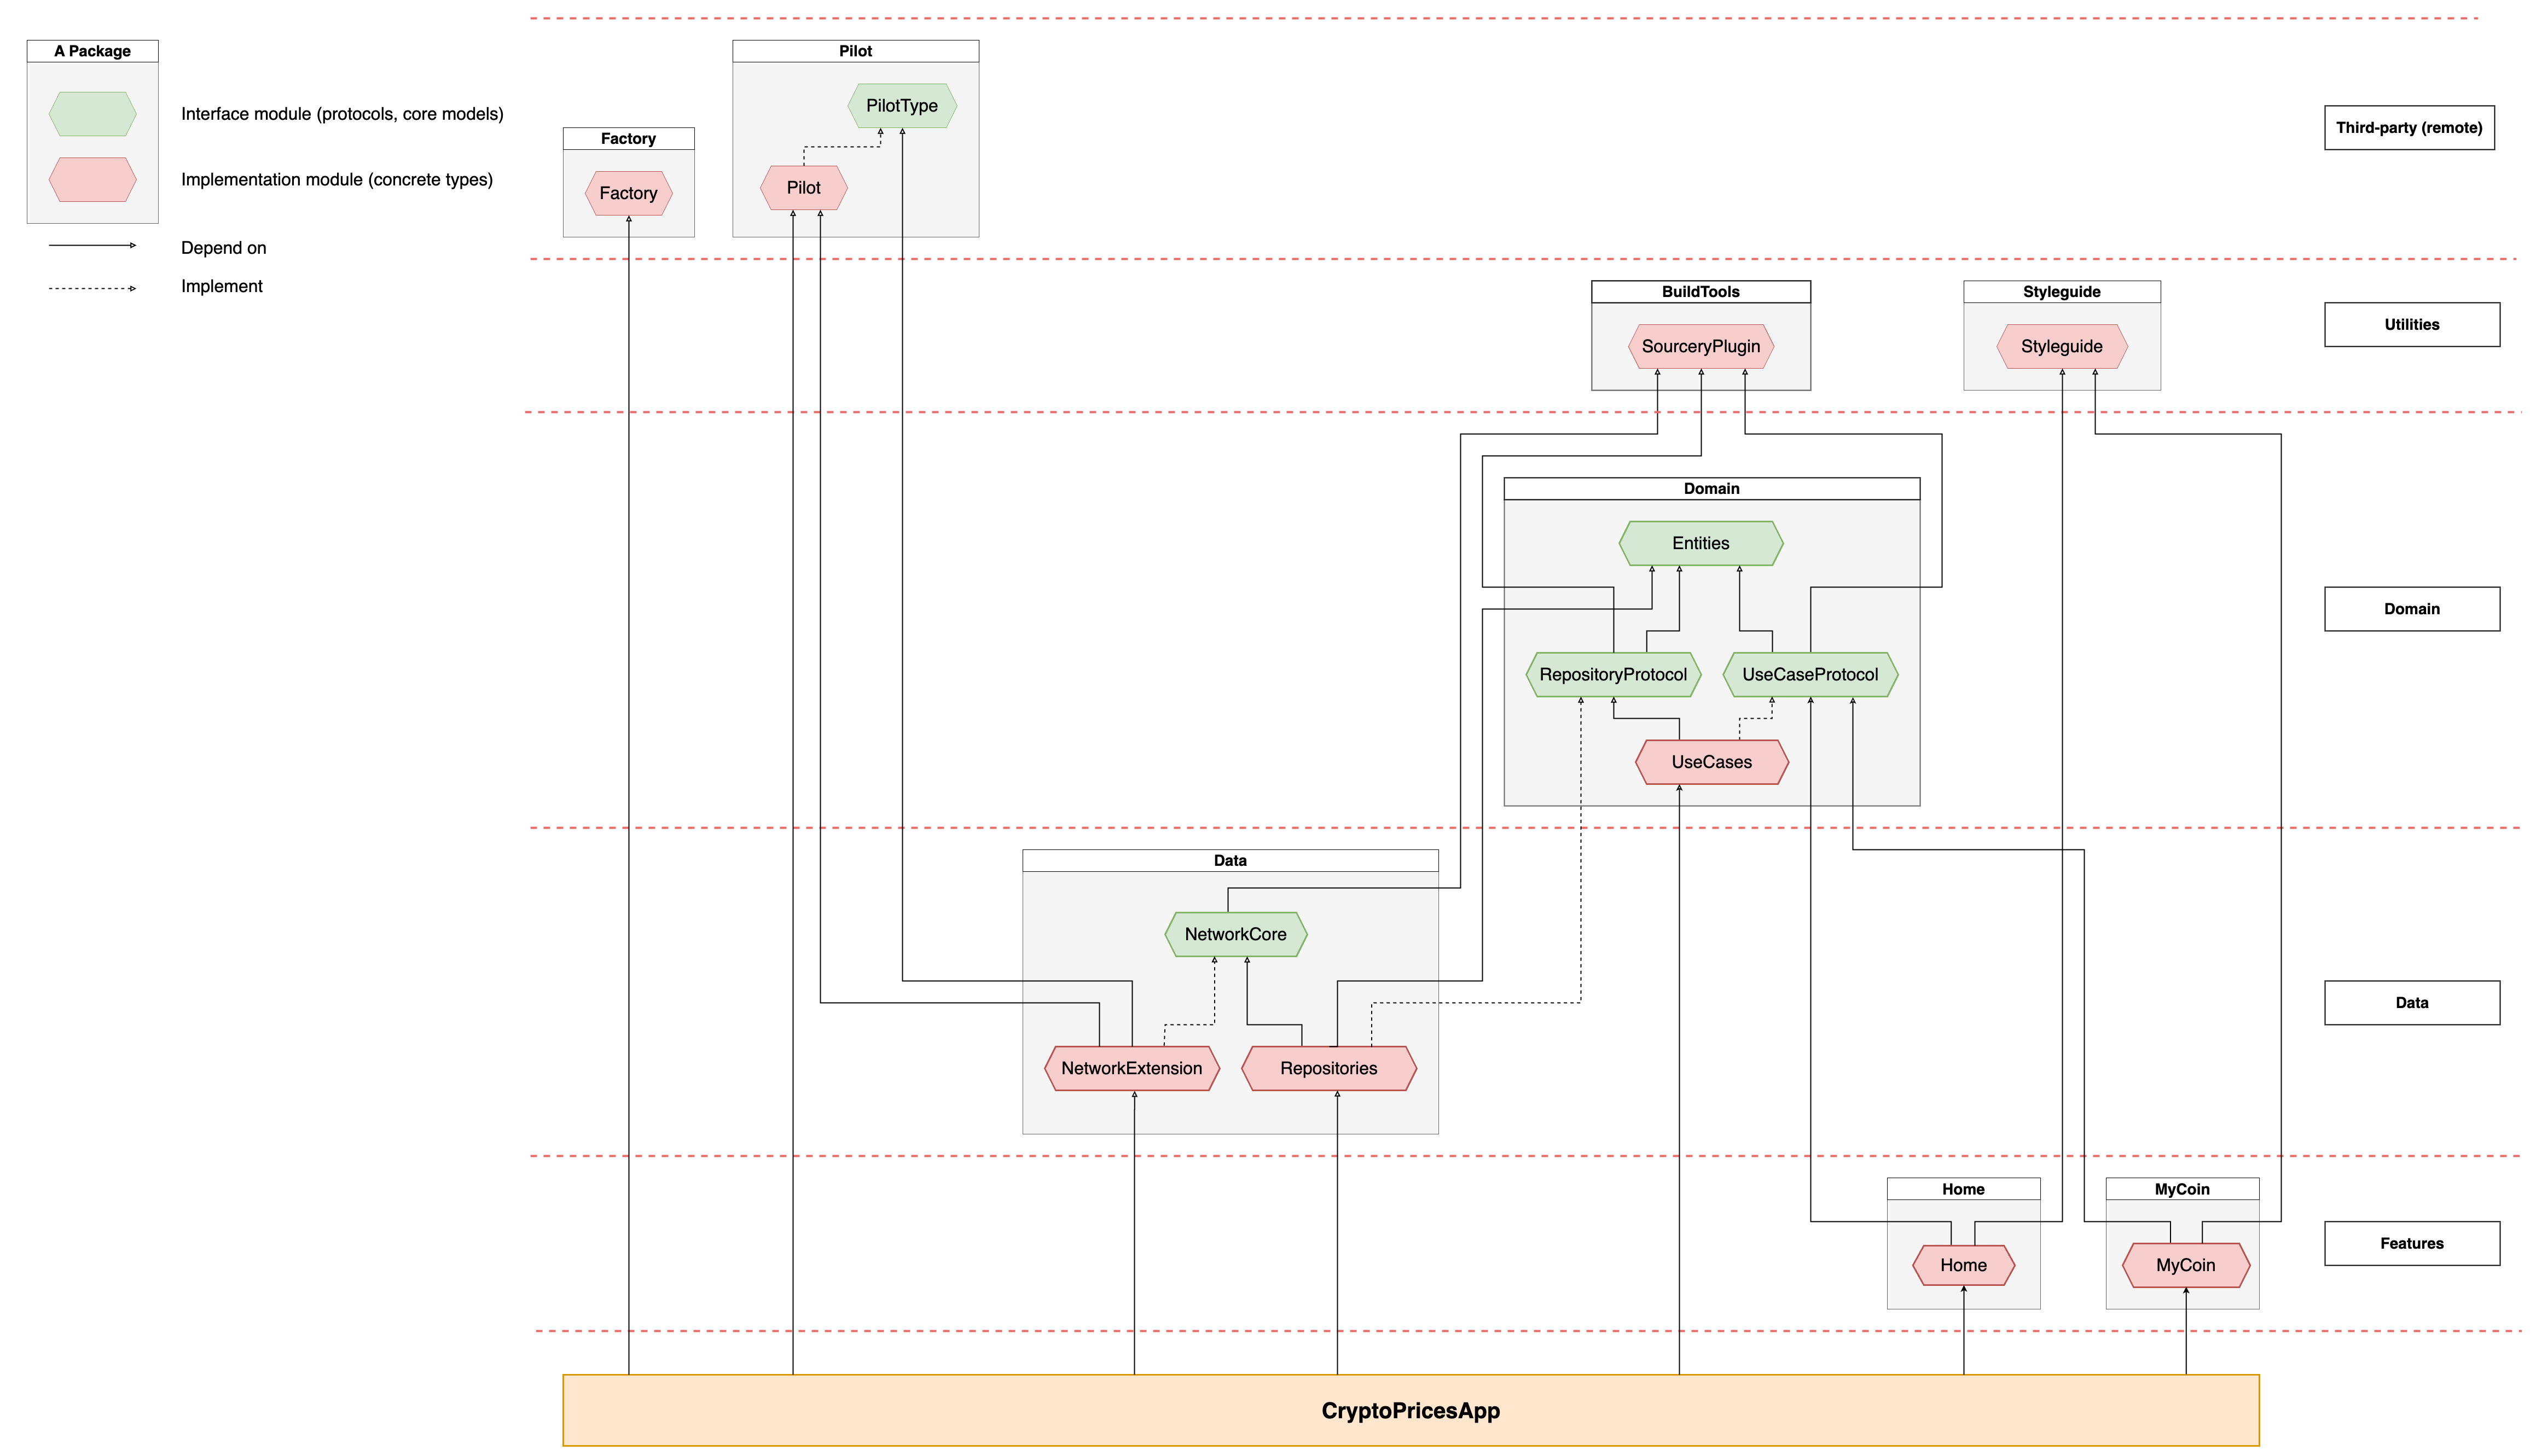
There are two color codes were used: red and green.
Red represents the implementation modules, which are the concrete type.
Green represents interface modules, which are considered as the API type:
- The Presentation layer includes the
HomeandMyCoinmodules. - The Data layer consists of
NetworkCore,NetworkExtension, andRepositories. - The Domain layer includes
Entities,RepositoryProtocol,UseCaseProtocol, andUseCases. - In Utilities, there are two plugins:
SourceryPluginandStyleguide. - Some third-party libraries include such as
Factory,Pilot, etc.
As illustrated in the graph, the application is organized into distinct layers, each housing one or more packages, which in turn contain one or more modules. The layers are vertically arranged, whereas modules from lower layers depend on those from higher layers, but not the other way around. Modules within the same package and layer remain unaware of each other, such as Home and MyCoin in the Features layer or BuildTools and Styleguide in the Utilities layer, fostering loose coupling and high cohesion.
Additionally, concrete modules at lower layers implement abstractions or interfaces from higher layers. This method of organizing the application’s components results in a well-structured system, facilitating improved manageability and scalability. To better demonstrate this technique, let’s take a look at the Home screen for instance.
Getting Coins Data
On the Home screen, the application fetches both the “My Coins” and “Trending Coins” lists from the server. As a result, the use cases for getting the data are needed. At this point, there is no need to import the UseCase implementation module as the Home screen only needs to depend on the UseCaseProtocol interface module and it already contains the required abstract definitions for the MyCoinsUseCaseProtocol and TrendingCoinsUseCaseProtocol:
import SwiftUI
import UseCaseProtocol

@MainActor public final class HomeViewModel: ObservableObject {

    private let myCoinsUseCase: MyCoinsUseCaseProtocol
    private let trendingCoinsUseCase: TrendingCoinsUseCaseProtocol
    ...
}
💡 One might wonder why the
Homemodule depends on theUseCasesProtocolinterface module instead of the concreteUseCasemodule. To address this question, it is essential to consider the primary objective of minimizing vertical dependencies by insulating theHomemodule from changes in theUseCasemodule’s implementation. Consequently, theHomemodule remains unaffected, eliminating the need for its rebuild during app builds. This strategy also offers advantages in unit testing, which we will discuss later.
Displaying and Mocking Coins
For displaying coins on the Home screen, it relies on two main models: MyCoinItem and TrendingCoinItem. Here is an example of the MyCoinItem:
import DomainTestHelpers
import Entities
import Foundation

public struct MyCoinItem: Identifiable, Equatable {

    public let id: String
    public let symbol: String
    public let name: String
    public let iconUrl: URL
    public let currentPrice: Decimal
    public let priceChangePercentage: Double

    public init(coin: Coin) {
        self.id = coin.id
        self.symbol = coin.symbol.uppercased()
        self.name = coin.name
        self.iconUrl = coin.image
        self.currentPrice = coin.currentPrice
        self.priceChangePercentage = coin.priceChangePercentage24H
    }
}

#if DEBUG
extension MyCoinItem {

    static let mock = MyCoinItem(coin: MockCoin.single)
}
#endif
The MyCoinItem model in the Presentation layer must import the Entities module from the Domain layer to access the Coin interface. Likewise, to create mock data using MockCoin.single, the application imports the DomainTestHelpers module from the Domain layer. This enables the creation of MyCoinItem UI models from across modules, e.g., from an API coin struct in the Data module or a mock coin struct in the Domain module, as long as they conform to the Coin interface.
Displaying Coin Details
From the Home screen, users can access and view a specific coin’s details. The app will then navigate to the MyCoin screen and display all details.
As modules from packages of the same layer should stay independent from each other, it is not recommended to directly import the MyCoin module into the Home module to make navigation to the MyCoin screen from the Home screen. Instead, the application has the AppView, which serves as the root navigation view and manages the AppCoordinator, which controls the state(s) of all the screen modules:
struct AppView: View {

    @StateObject private var appCoordinator: AppCoordinator = .init()
    @State private var showingMyCoin = false

    var body: some View {
        NavigationView {
            ZStack {
                HomeView(viewModel: Container.homeViewModel())
                    .environmentObject(appCoordinator.homeState)

                NavigationLink("", isActive: $showingMyCoin) {
                    appCoordinator.myCoinState.map {
                        MyCoinView(viewModel: Container.myCoinViewModel())
                            .environmentObject($0)
                    }
                }
            }
        }
        .onReceive(appCoordinator.$myCoinState) {
            showingMyCoin = $0 != nil
        }
    }
}
With this approach, developers can keep a clean separation between the MyCoin and Home modules. Whenever users want to navigate to the MyCoin screen, the state of the HomeState can be easily updated with the didSelectCoin as the coin’s ID, and the AppView will take care of the rest by activating the showingMyCoin variable to display the MyCoinView:
public final class HomeState: ObservableObject {

    @Published public var didSelectCoin: String?
    ...
}
struct TrendingCoinsView: View {

    @EnvironmentObject var homeState: HomeState

    var body: some View {
        VStack(spacing: 16.0) {
            ForEach(coins) { coin in
                TrendingCoinItemView(coin)
                    .onTapGesture {
                        homeState.didSelectCoin = coin.id
                    }
    ...
}
Managing Networking Layer
Another specific sample of this interface/implementation module technique is how the application manages the networking layer.
The diagram above shows that both Repositories and NetworkExtension (implementation modules) depend on the NetworkCore (an interface module), and the NetworkExtension depends on a 3rd networking library - Pilot. Say there is a need to switch the networking library to a new one later on, e.g., Moya or Alamofire, then the Repositories will remain unchanged and will not be rebuilt between application builds. 🚀
Dependency Injection
To modularize an iOS application effectively, it is essential to implement Dependency Injection (DI). This ensures that individual modules can be generated efficiently and with proper isolation.
Using DI in modularization
Modularization necessitates the use of dependency injection (DI) to facilitate the exchange of dependencies between modules. Two primary DI types are Constructor Injection and Property Injection. Employing a dependency injection framework, such as Factory, assists in managing dependencies while reducing boilerplate code. This lightweight framework streamlines the process of defining and injecting dependencies into the application.
Here is an excellent example of implementing Factory within an application:
- The dependencies are consolidated in a single file (e.g.,
Container+Injection.swift) at the main application level, encompassing all essential components and modules for the application. -
Within this file, Factory outlines each dependency and its method of creation or injection into other areas of the application:
@MainActor extension Container { // Network static let coinAPI = Factory<CoinAPIProtocol>(scope: .cached) { Pilot<CoinRoute>() } // ViewModels static let homeViewModel = Factory(scope: .cached) { HomeViewModel( myCoinsUseCase: myCoinsUseCase.callAsFunction(), trendingCoinsUseCase: trendingCoinsUseCase.callAsFunction() ) } static let myCoinViewModel = Factory { MyCoinViewModel( coinDetailUseCase: coinDetailUseCase.callAsFunction(), getChartPricesUseCase: getChartPricesUseCase.callAsFunction() ) } // Repositories static let coinRepository = Factory<CoinRepositoryProtocol>(scope: .cached) { CoinRepository(coinAPI: coinAPI.callAsFunction()) } // UseCases static let myCoinsUseCase = Factory<MyCoinsUseCaseProtocol>(scope: .cached) { MyCoinsUseCase(repository: coinRepository.callAsFunction()) } ... } - In
Container+Injection.swift, each dependency is defined using theFactoryfunction. Thescopeparameter determines the lifetime of the dependency, withcachedindicating that the same instance should be reused each time the dependency is injected.
💡 As an illustration, the
coinAPIdependency is defined as aFactoryof typeCoinAPIProtocolwith ascopeof.cachedand returns an instance ofPilot<CoinRoute>(). Similarly, thehomeViewModeldependency is defined as aFactorywith ascopeof.cachedand it returns an instance ofHomeViewModelwith the required dependencies injected via their correspondingcallAsFunction()method. The same pattern is followed for the remaining dependencies such ascoinRepository,myCoinsUseCase, and so on.
-
Once having a file containing all the DI definitions, then when we need an injection, e.g., create instances of the
HomeViewModelorMyCoinViewModel, they can be injected by simply callingContainer.homeViewModel()andContainer.myCoinViewModel():struct AppView: View { ... HomeView(viewModel: Container.homeViewModel()) NavigationLink("", isActive: $showingMyCoin) { appCoordinator.myCoinState.map { MyCoinView(viewModel: Container.myCoinViewModel()) } } ... } }
From the above code, it retrieves an instance of the HomeViewModel from the Container via its factory method. The factory method takes two arguments, namely myCoinsUseCase, and trendingCoinsUseCase. These arguments are also created using DI by calling their respective factory methods - callAsFunction() in the Container extension.
Once the instances of the view models are created, they can be passed to the respective views as parameters for usage. In the example code above, the HomeViewModel instance is passed a parameter of the HomeView, and similarly for the MyCoinViewModel instance.
Unit testing
When developing mobile applications, it’s vital to have unit testing as part of the development process, especially in the case of modularization.
Unit testing helps ensure that each module of the application is working as expected and that all the different modules can work together seamlessly.
How to Write Unit Tests for Micro-Modules
In the example application - CryptoPrices iOS, each module is organized with its individual test file. As a result, both Home and MyCoin screen modules have their own test files. Moreover, the Domain module incorporates UseCase tests, whereas the Data module has its Repository tests, and so on.

For instance, in the Home module, test cases can be created to verify that the HomeViewModel correctly returns data for My Coins and Trending Coins. To accomplish this, mock dependencies of the MyCoinsUseCase and TrendingCoinsUseCase are used to produce the expected data for the test cases:
final class HomeViewModelSpec: QuickSpec {

    override func spec() {

        var homeViewModel: HomeViewModel!
        var myCoinsUseCase: MockMyCoinsUseCaseProtocol!
        var trendingCoinsUseCase: MockTrendingCoinsUseCaseProtocol!

        describe("the HomeViewModel") {

            beforeEach {
                myCoinsUseCase = MockMyCoinsUseCaseProtocol()
                trendingCoinsUseCase = MockTrendingCoinsUseCaseProtocol()
                homeViewModel = await HomeViewModel(
                    myCoinsUseCase: myCoinsUseCase,
                    trendingCoinsUseCase: trendingCoinsUseCase
                )
            }

            describe("its initial state") {

                it("has the correct value for myCoins") {
                    await expect {
                        await homeViewModel.myCoins
                    }
                    .to(beEmpty())
                }

                it("has the correct value for trendingCoins") {
                    await expect {
                        await homeViewModel.trendingCoins
                    }
                    .to(beEmpty())
                }
        ...
        }
    }
}
In the Domain and Data module, various UseCases (e.g., CoinDetailUseCaseSpec, GetChartPricesUseCaseSpec, etc.) are testable by injecting mock dependencies of CoinRepository. Similarly, the Repository can be tested by injecting a mock dependency of the CoinAPI - MockCoinAPIProtocol. These mock dependencies can return any desired mock data for the test cases. Here is an example of a successful test case for retrieving myCoin API:
...
final class CoinRepositorySpec: QuickSpec {

    override func spec() {

        var coinAPI: MockCoinAPIProtocol!
        var coinRepository: CoinRepository!

        ...

        describe("the CoinRepository") {

            beforeEach {
                coinAPI = MockCoinAPIProtocol()
                coinRepository = CoinRepository(coinAPI: coinAPI)
            }

            describe("its myCoins() call") {

                context("when the coinAPI returns success") {
                    let expectedCoins = APICoin.dummyCoins

                    beforeEach {
                        coinAPI.myCoinsReturnValue = expectedCoins
                    }

                    it("returns correct value") {
                        await expect {
                            try await coinRepository.myCoins().compactMap { $0 as? APICoin }
                        }
                        .to(equal(expectedCoins))
                    }
                }
...
Challenge Case Studies
Throughout the modularization process for the example iOS application, the team encountered two main challenging topics:
UI Tests
Although the project did not include UI tests, we had a lengthy discussion about where to place the UI test cases. Initially, by default, we thought it would be best to do it just like the unit tests that each module needs to organize its own UI tests. Unfortunately, It was realized that UI test flows could involve more than one module.
Therefore, it is concluded that UI tests for a specific feature could be placed in its own module because that’s where the implementation is. At the same time, developers can keep the UI tests that involve more than one feature at once, such as integration tests, on the main application target.
Navigation
As mentioned above, since feature modules are organized separately in different Swift packages and tend to be reused in different flows and scenarios, they shouldn’t know about each other. Specifically, a view (or series of views of a feature) shouldn’t know what view is previous to or next after them. The challenge here is how the application navigates from one view to another without knowing each other.
To address this, we introduced the AppCoordinator. The AppCoordinator lives on the application target and is responsible for managing the entire application state. In order to do that, it keeps track of every view’s state:
final class AppCoordinator: ObservableObject {

    @Published var homeState: HomeState = .init()
    @Published var myCoinState: MyCoinState?
    ...
By observing state updates from one view, it can change the state of another view, thus effectively changing the entire application state:
final class AppCoordinator: ObservableObject {

    ...

    init() {
        let myCoinStatePublisher = $homeState
            .flatMap(\\.$didSelectCoin)
            .compactMap { $0 }
            .map { Just(MyCoinState(id: $0)) }
            .assertNoFailure()
            .switchToLatest()
            .share()

        myCoinStatePublisher
            .map(Optional.some)
            .assign(to: &$myCoinState)

        myCoinStatePublisher
            .flatMap(\\.$didSelectBack)
            .filter { $0 }
            .map { _ in nil }
            .assign(to: &$myCoinState)
    }
}
Each view has its own state that exposes the current state of the view. The state is modeled as an ObservableObject, e.g., when the view is loading, or the navigation bar’s back button is tapped, etc.:
public final class MyCoinState: ObservableObject {

    @Published public var id: String = ""
    @Published public var didSelectBack = false

    public init(id: String) {
        self.id = id
    }
}
The state can then be passed down from the ancestor/parent to the view as an @EnvironmentObject.
public struct MyCoinView: View {

    @EnvironmentObject var myCoinState: MyCoinState
}
The final piece is the AppView, which owns the AppCoordinator. The AppView utilizes the application state that is exposed by the AppCoordinator to update the view hierarchy of the entire application. This involves creating a new view for presentation, dismissing the current view, and so on. The AppView’s task is relatively straightforward, as the majority of the work has been completed by the AppCoordinator:
struct AppView: View {

    @StateObject private var appCoordinator: AppCoordinator = .init()
    @State private var showingMyCoin = false

    var body: some View {
        NavigationView {
            ZStack {
                HomeView(viewModel: Container.homeViewModel())
                    .environmentObject(appCoordinator.homeState)

                NavigationLink("", isActive: $showingMyCoin) {
                    appCoordinator.myCoinState.map {
                        MyCoinView(viewModel: Container.myCoinViewModel())
                            .environmentObject($0)
                            .labelsHidden()
                    }
                }
            }
        }
    }
}
Conclusion
Modularization using SwiftUI and SPM is an influential approach to enhancing the scalability and maintainability of iOS applications.
From a developer experience perspective, adopting a modular architecture allows iOS developers to divide their code into reusable, self-contained modules, which can be effortlessly shared across projects. Consequently, developers can create applications that are simpler to test, debug, and maintain while also boosting code quality and decreasing development time. At the application level, modularization leads to improved build times, eliminates coupling between components, and eases the addition of new features.
In summary, by adopting this methodology, developers can create more robust and scalable applications that better address the needs of users and stakeholders.
Acknowledgement
I want to express my gratitude to Mike Pham for initiating the CryptoPrices Engineering showcase project, which served as the foundation for this blog post. Mike played a crucial role in assembling the team and provided valuable feedback as the technical reviewer. He was also responsible for the final audit and for revamping the entire blog post by restructuring its ideas and improving its wording. His efforts in collaborating with other teams also made this post possible.
I also want to thank Thieu Doan for being the team leader of the CryptoPrices project. Thieu proposed and implemented the idea of applying modularization to the project, which is the central topic of this blog post. He also helped provide the first draft for the Technical choices and Challenge case studies sections.