
Beautiful Illustration done by Mai from our Design Team
We started using Docker as part of our development process around the second part of 2015. Prior to that, every project was set up the “old” way requiring to manually install all the dependencies (libraries and services) on each developer’s machine.
As a software development consultancy, we have to wrangle around different stacks and platforms. So the application setup process could literally take a few hours and yield very mysterious errors. To make this process better, we use version managers such as RVM (Ruby Version Manager) or NVM (Node Version Manager) allowing to run multiple versions of libraries and language (Ruby, Node.JS) side-by-side. These tools work really well so we can work on multiple projects, each using the required versions of its dependencies.
But there was no straightforward solution to manage simultaneously multiple versions of dependencies such as databases. Say a project is using Postgres 9.2 and another one Postgres 10.1, it requires some manual setup with Homebrew (mac package manager). Usually, even those workarounds only allow to switch which version is active, so only one version is running at any given time.
We had also dabbed into Vagrant for some applications but never seriously enough to include it as a de facto fixture in our development workflow.
Then we switched to Docker bringing a huge improvement to our development workflow. At first, it took us some time to get it right as Docker was still in its infancy. At that time, it had limited capabilities and tons of issues. Despite those early inconveniences, we used it in a few projects and quickly replicated the setup to make it part of our project template.
But until recently, our usage of Docker was still confined to the development environment. When looking back, it made sense as Docker was not “production-ready” for a very long time. But over the past two years, the whole ecosystem has matured. More and more service providers, such as Semaphore or Circle CI for continuous integration and delivery services (CI/CD), and Heroku or Amazon AWS for web services, jumped onto Docker as a preferred platform and all now provide Docker-based solutions for testing and deploying Docker-based applications. So we felt it was time for us to update our setup.
Our Setup
The switch did not happen overnight 💪 It took us time doing research, comparing the pros and cons of each option, lots of trials and errors on various internal projects to eventually settle on the following setup for all environments.
Development
This environment refers to how the application is run locally on a developer machine. It differs to the other environments as some settings are enabled to make the development easier and faster (enhanced error logging, disabled code caching for instance). This is the environment in which we made the least changes.
Currently, our setup is:
-
The application runs directly on the host machine.
-
The services, databases such as Postgres and Redis or search engines such as Elastic, run in Docker containers via Docker Compose (version 3.2).
We opted not to run the application in a container. After trying it for a while on a few projects, we did not find any compelling reason to do so.
Worse, it affected negatively our productivity as debugging required some manual work (attaching to a container process each time) and did not integrate well with our IDE of choice.
Also, during development, the application dependencies do change quite often, but each change requires a rebuild of the Docker image. Even with proper caching of the dependencies bundle using volume, it was taking valuable development time.
The version managers (RVM, NVM) we previously talked about still work very well. So there is no issue in running applications with different versions of Ruby or Node.JS. But at the same time, running the services such as databases eases a lot the pain from setting up applications. So we feel that our current setup leverages the best of what each tool can provide while not sacrificing development productivity.
Test
This environment refers to how the application is running when executing the automated tests. This is very close to production in terms of application behavior but with some minor settings differences such as using test-only services (separate test database, mocked third party services).
We overhauled entirely our test setup:
-
Both the application and services run in Docker containers via Docker Compose (version 3.2).
-
Execute the tests inside the application Docker container.
This change allowed us to switch to the Docker-based offering of Semaphore which is our go-to CI/CD provider. We have been happy customers so far as Semaphore has always done a great job at updating their platform frequently. Every couple of weeks, new versions of Ruby or Node were added, but we had no control over it. If a version was missing, either we had to install by ourselves on each build or change the version used in the project to match one of the available version on their platform. Using the Docker-based platform removes this impracticality.
Tests need to run as fast as possible. The faster a developer gets feedback (a test fails or pass), the faster he/she can develop. To isolate each feature or improvement, the code is divided into branches which are tested separately. But before being able to execute tests, the application and its dependencies need to be installed and built. This happens every time new code is pushed. So the build time needs to be as fast as possible. The most direct way to solve this is to only build what was changed. That’s where caching the build artifacts comes into play. And that’s precisely where Docker and Docker Compose shine.
Prior to Docker, most providers created their own “proprietary” caching mechanism which could have — to be honest — a negative “hit-and-miss” ratio. Caching is built into the core of Docker and was added recently to Docker Compose. As a result, caching via Docker/Docker Compose works way better. That alone represents a huge efficiency improvement.
](/public/images/posts/rails-on-docker/it-hell.png)
Tests must also have consistent behavior. Tests failing due to environment differences is a developer nightmare. With Docker, since the test environment built on the CI/CD server can also be built on a local machine, the possibility of environment discrepancies is nil. If a test fails, we can eliminate the environment factor and focus on the underlying cause in the application code. And right there, that’s what we call a developer heaven.
Production
This environment refers to how the application is running on the servers servicing the end users. So far, we have only ventured onto deploying our Docker-based application on Heroku with the following setup:
-
All the applications processes (web application, workers) run in Docker containers.
-
Heroku add-ons are used for services (databases, search engine…). Docker Compose is not supported by Heroku so it’s not possible to deploy our own database or search engine service.
While our production setup is currently Heroku-specific, we are able to easily deploy the same application to other services providers with minimal efforts.
As the web application is deployed and running in a Docker container, it’s only a matter of running it via Docker Compose instead of Docker. As a consequence, switching to Docker made us less reliant on Heroku for deployments. It also prepares the applications to scale using more advanced architecture such as Docker Swarm or Kubernetes.
During the process of updating our project processes, we also learned a few key concepts that are worth sharing for those who are not familiar with how you get about deploying Docker-based applications.
Docker Images Caching
As briefly discussed when dealing with our test environment setup, since images need to be built each time the application is executed or deployed, the build process can become a significant bottleneck. Depending on the requirement of the project, building a fresh image can take anywhere from one minute to over ten minutes. Without caching, it would not be sustainable. That’s why caching is a built-in feature of Docker and Docker Compose.
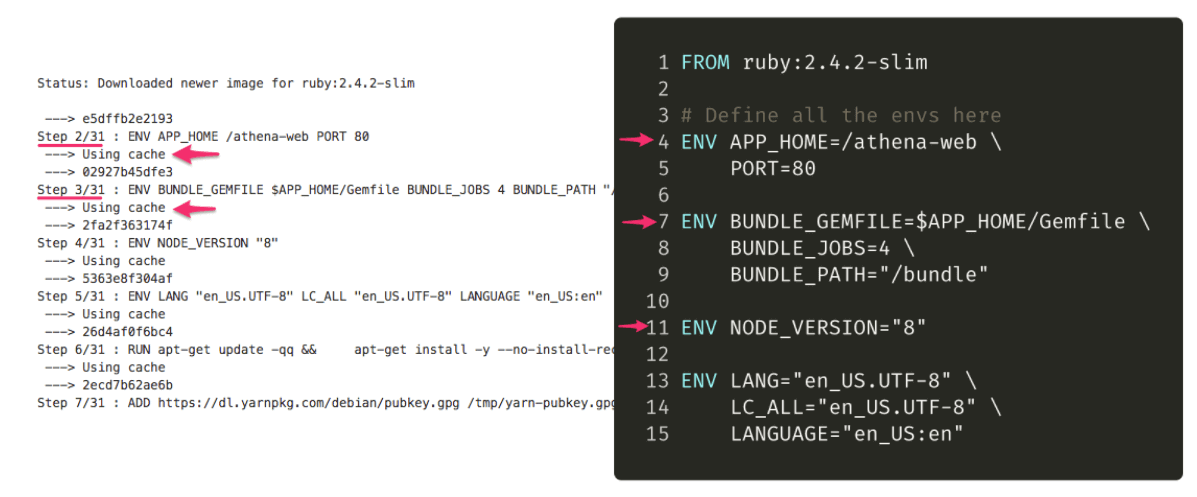
Docker caching works at the line-level of the Dockerfile. Each line is an instruction step in the build process. When executing a build the results of the instruction step is extracted and saved into its own layer identified by a hash. So an image is essential in the assembly of all these separate layers into one unit.
During the build process, a diff is made on each line. If a line did not change, there is no need to rebuild this layer. The build process can just re-use the existing layer and skip to the next instruction line. This is visible in the CLI output (see above). If the cache is used, “Using cache” is displayed right under the instruction step.
But if a line did change then the cache for this step and all the following ones are automatically invalidated.
That is why one of the best practice when creating Dockerfile is to combine multiple lines of instructions line into a single line to reduce the number of steps and cache layers.
RUN apt-get update -qq
RUN apt-get install -y --no-install-recommends build-essential nodejs yarn google-chrome-stable

# Better
RUN apt-get update -qq && \
    apt-get install -y --no-install-recommends build-essential nodejs yarn google-chrome-stable && \
    ...
As for Docker Compose, caching images is a more recent addition (as of version 3.2). In order use it, modify the Docker Compose file using the cache_from setting of build :
version: '3.2'
  db:
    image: postgres:10.1
    container_name: athena_db
    ports:
      - "5432"

  web:
    build:
      context: .
      cache_from:
        - nimblehq/athena_web:latest
    image: nimblehq/athena_web:latest
    container_name: web_app
    command: bin/start.sh
    depends_on:
      - db
Container Registries
Caching only works locally so if the containers will be running on another machine such a CI/CD server or a web server, the image will need to be rebuilt from scratch every time. That’s where container registries come in.
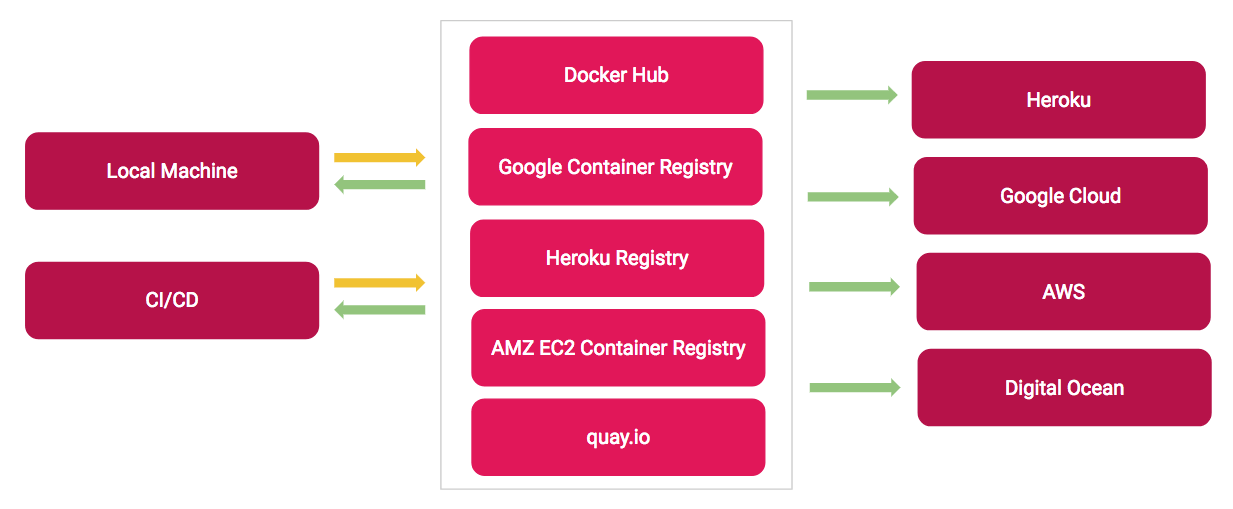
The registries act similarly to code repositories and store all the versions for a Docker image. Versioning works by using tags. A tag is the unique text-based identifier placed after the image name (after :). So a complete image definition looks like this: nimbl3/athena_web:1.0.0 or nimbl3/athena_web:latest(latest being the default tag when no tag is specified).
In our setup, we use two registries:
-
Docker Hub: used on our CI/CD service to pull and push images for testing purposes.
-
Heroku Registry: used to deploy the web applications processes
Note that it’s entirely possible to only use a single registry. Using the Heroku Registry is just a requirement when using Heroku.
Setup Guide
In this section, we provide a practical guide on how to start using Docker in development, test and production environment. The example is based on the following:
-
Ruby on Rails application
-
Semaphore for CI/CD
-
Heroku for deployment and hosting
Apart from a few Heroku specificities, most of the guide is applicable to other types of applications and providers.
Docker Configuration
├── Dockerfile
├── Dockerfile.web
├── Dockerfile.worker
├── docker-compose.dev.yml
├── docker-compose.test.yml
└── docker-compose.yml
Here are the details and examples for each file:
-
Dockerfile (example): contains the configuration to build the web application image
-
Dockerfile.web (Heroku specific): duplicate of Dockerfile but required by Heroku to deploy each process to a separate container. This is not required when deploying a single-process-based application.
-
Dockerfile.worker (Heroku specific): contains the configuration for the worker process. In this case, the worker is used to process background jobs (via Sidekiq). So the Dockerfile configuration is very minimal: a base image definition (which is the web application) and a command.
FROM nimblehq/athena-web

CMD bundle exec sidekiq -C config/sidekiq.yml
-
docker-compose.dev.yml (example): contains the Docker configuration for the development environment
-
docker-compose.test.yml (example): contains the Docker configuration for the test environment
-
docker-compose.yml (example): contains the Docker configuration for the production environment
Update: when pushing or pulling Dockers images to/from the registry, it’s critical to define which tag to use, otherwise the image with tag
latestwill be used. Using ARG allows to have dynamic data in a Dockerfile:
First, export to an environment variable the tag to use. We will use the branch name (the weird syntax is necessary to remove special characters from the string):
export BRANCH_TAG=${BRANCH_NAME/\//-}
Then edit the Dockerfiles with:
ARG BRANCH_TAG=latest
FROM nimblehq/athena-web:$BRANCH_TAG
CI/CD Server
Switching to Docker has simplified dramatically our build steps on the CI/CD server. As the build steps are configured inside the Dockerfile, it’s now just a matter of building the image and running the tests.
Step 1: Build and tag a Docker image for each branch
export BRANCH_TAG=$SEMAPHORE_BRANCH_ID
We use the built-in environment variable $SEMAPHORE_BRANCH_ID to define the Docker image tag. A better solution would be to use $SEMAPHORE_BRANCH_NAME but as we use git-flow for branching, our branch names contain characters that cannot be used as a Docker image tag e.g. feature/setup-docker contains a forward slash / which is invalid as a tag as it would result into the following nimblehq/athena_web:feature/setup-docker
Other CI/CD providers such as Codefresh actually provide a normalized branch name variable that can be used as a valid tag. But in any case, it’s something to pay attention to as pushing an image with an invalid tag yields cryptic errors that seem entirely unrelated to the underlying tagging issue 😢
if ([ $BRANCH_NAME != 'master' ] && [ $BRANCH_NAME != 'development' ]); then (docker pull $DOCKER_IMAGE:$BRANCH_TAG); else (echo "Skipping docker pull for $BRANCH_NAME branch"); fi || true
In order to leverage caching, it’s necessary to first attempt to pull the container image from the container registry. If none exists yet (for instance on the first build for the branch), this step is skipped. That’s where the image size matters as it needs to be pulled on every single build.
But for the master and development branches, the container image should be rebuilt from scratch on every single build as the application dependencies might have changed. That’s why it’s necessary to check for these two branches to disabling caching.
docker-compose -f docker-compose.test.yml build
Build the container image. If a previously built image has been pulled, thanks to the use of caching, the build process can take mere seconds. On the contrary, on the first build, this step takes several minutes to complete.
docker push $DOCKER_IMAGE:$BRANCH_TAG
After each successful build, a new version for the container is pushed. Only the container layers that changed are pushed. So the whole image is not pushed every single time. Again during the first build, this step can take up to a minute but mere seconds on consecutive builds.
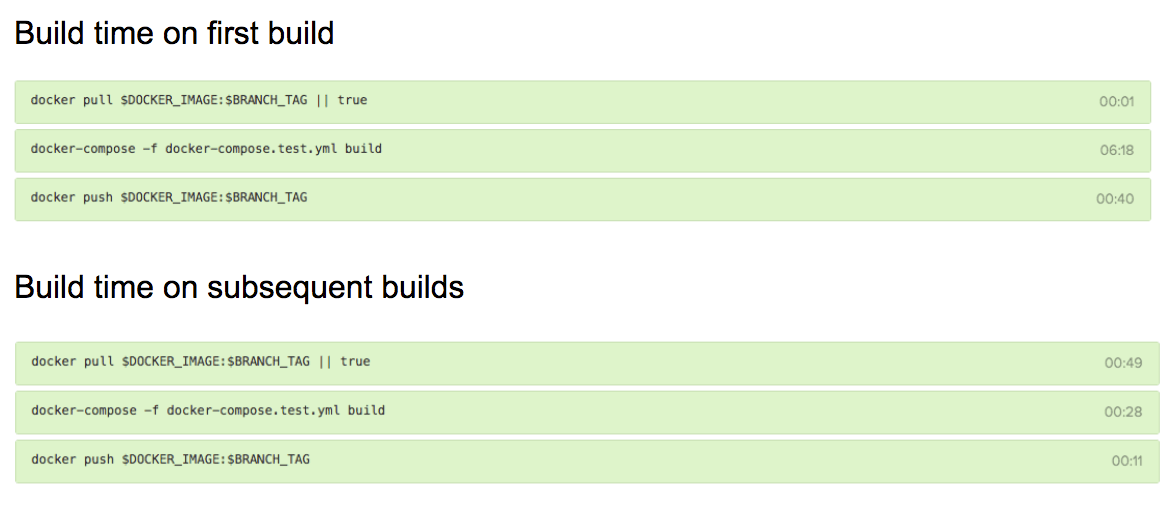
As we can see, there are considerable differences between the first and subsequent builds due to the leverage of caching.
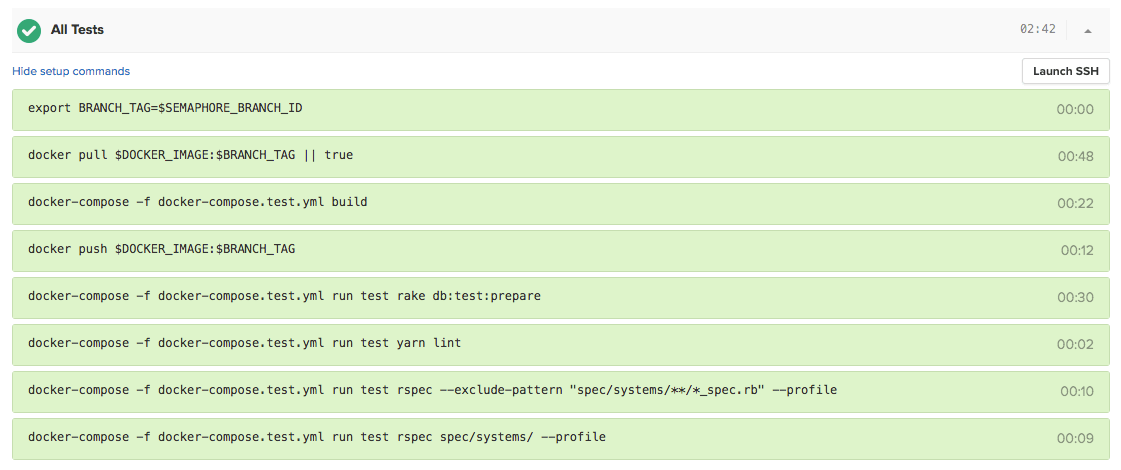
docker-compose -f docker-compose.test.yml run test rake db:test:prepare
At last, we need to create the test database required to run the tests.
Step 2: Execute the tests
Depending on your tests procedure, the following might vary. Our tests cover both Ruby and JavaScript code. We also split our tests to be able to run tests in parallel.
docker-compose -f docker-compose.test.yml run test yarn test
Execute the Javascript linter and unit tests.
docker-compose -f docker-compose.test.yml run test rspec --exclude-pattern "spec/systems/**/*_spec.rb" --profile
Execute only the rspec unit tests.
docker-compose -f docker-compose.test.yml run test rspec spec/systems/ --profile
Execute only the system (UI) tests.
That’s it. Tests are now running in a container and we are ready to deploy it 🚀
Web Server
Switching to Docker has also simplified our deployment process for the same reasons explained above. As the build steps are configured inside the Dockerfile, deploying an application is only a matter of building the image(s) and pushing it to a container registry.
heroku container:push web worker --recursive
This builds and pushes to Heroku Registry two images based on the configuration of Dockerfile.web and Dockerfile.worker. Each time a new image is pushed, Heroku automatically deploys it.
Upon the first deployment on Heroku, the applications are automatically switched from the default runtime to the container runtime (as indicated on the Heroku dashboard).

The command for each container is also parsed automatically from the Dockerfile configuration files (Dockerfile.web and Dockerfile.worker).

Some gotchas when deploying Docker-based applications to Heroku:
-
Applications need to boot within 60 seconds otherwise it will be killed automatically. Lengthy processes such as assets pre-compilation (both sprockets and webpacker) need to be a build step defined in the Dockerfile.
-
All containers are restarted even if only one process is deployed. In our setup, even if we only deployed the web container, the worker container would be restarted at the same time.
Conclusion
While there are many things to consider when using Docker in all environments, we are satisfied with our updated setup. It solves not only some painful points of software development such as setting up an application from scratch or having inconsistent testing behaviour across platforms, but also maintains the existing benefits of deploying on managed platforms like Heroku.
We are continuously iterating on our processes so our Docker setup will keep improving. On our roadmap, we plan to decrease the image size substantially by using Alpine images to speed up even more our tests suites and deployments 🏎
-
This post is based on a retrospective session held on January 17th, 2018
-
All the code example used in this post can be found in our open source Rails template
-
If you are not familiar with Docker and Docker Compose, we recommend this beginner-friendly introduction Docker
-
Is there something you find that we could have done better? Drop us a message.