
Jenkins is up and sailing now! Illustration done by Nimble design team
Fundamentally, when it comes to the use of Continuous Integration & Continuous Delivery systems (CI/CD), mobile development is not significantly different from other types of software development projects. So our flow at Nimble is not specific to us by any means and can be applied in any team or environment:
-
Developers collaborate as a team using a Source Control Management system (SCM) e.g. Git.
-
Pull requests are created for code review purposes. While rounds of reviews are performed, the pull requests are automatically tested on the CI/CD server before being merged to the
developmentormasterbranches. Whether it’s a feature or a bug fix, all branches are automatically tested and verified. -
We then expect to get feedback on test failures and code quality e.g. via email or Slack notifications. Tests are executed not only on the branch itself but also on the destination branch. For the latter, we are performing a pre-merge verification allowing us to check before merging if the pull request could accidentally break our build stability.

- Upon passing successfully all tests on all branches, new versions of the application are automatically deployed to beta testers and/or, to the online stores for the end users.
To this end, Jenkins allows us to define build and deployment pipelines in a structural way and project-based editable tool — the Jenkinsfile. If you are familiar with CI services platforms such as Circle CI or Travis CI, this is equivalent to their typical yml configuration file.
Jenkins has a built-in multi-branch pipeline feature which automatically:
-
Creates new Jenkins jobs for every new pull request in your repository or via a standard branch push trigger.
-
Cleans up the jobs as branches are merged.
So no more webhooks or cumbersome configuration needed.
On top of that, Jenkins can easily be run inside a Docker container and has lots of well-tested and production-ready plugins such as the BlueOcean plugin (which improves a lot the pipeline UI 💅). Thus, CI/CD servers require less and less effort to install, configure and maintain.
Tip 💡: If you have not caught up with our past post on how to setup Jenkins in a Docker container with the BlueOcean plugin, read it HERE.
Pipelines: The Big Picture
As Jenkins should go through all the verification steps per branch — each time a commit get pushed to the repository — the pipeline could be drawn up as the following steps (or stages as per the Jenkins nomenclature):
-
Check out the working branch from a remote repository e.g.
git pull feature/feature-name. -
Build the project e.g. for Android with Gradle build
./gradlew assembleDebug. -
Execute in parallel the linters, code analyzer, unit tests, and integration tests. Each type of test is separated into a distinct step. It’s critical to note that each step must pass to be able to the next step. This fail fast strategy is a time saver as it allows us to quickly identify and fix issues faster before moving to steps with long processes such UI testing or deployment.
-
Execute UI tests using emulators/simulators.
-
Deploy with fastlane.
-
Sync the validation results to the repository host e.g Github or Bitbucket.
Since UI testing requires emulators/simulators with hardware acceleration — which is the main benefits of using your own Jenkins server over paid services like Travis CI or Circle CI — this pipeline requires to be executed on a dedicated machine environment.
In practice, it means that while the Jenkins server runs in a Docker container, a slave node will be used to execute the pipeline on a real machine (could be the same host machine or another machine). The communication between the Jenkins master server and the node is established via the JNLP. For this to work, the identity of the slave(s) node needs to be defined in the Jenkinsfile(we will cover this specification below).
Pipelines: The Fun Part
Step 1: Let’s start with a new Jenkins multi-branch pipeline project item.
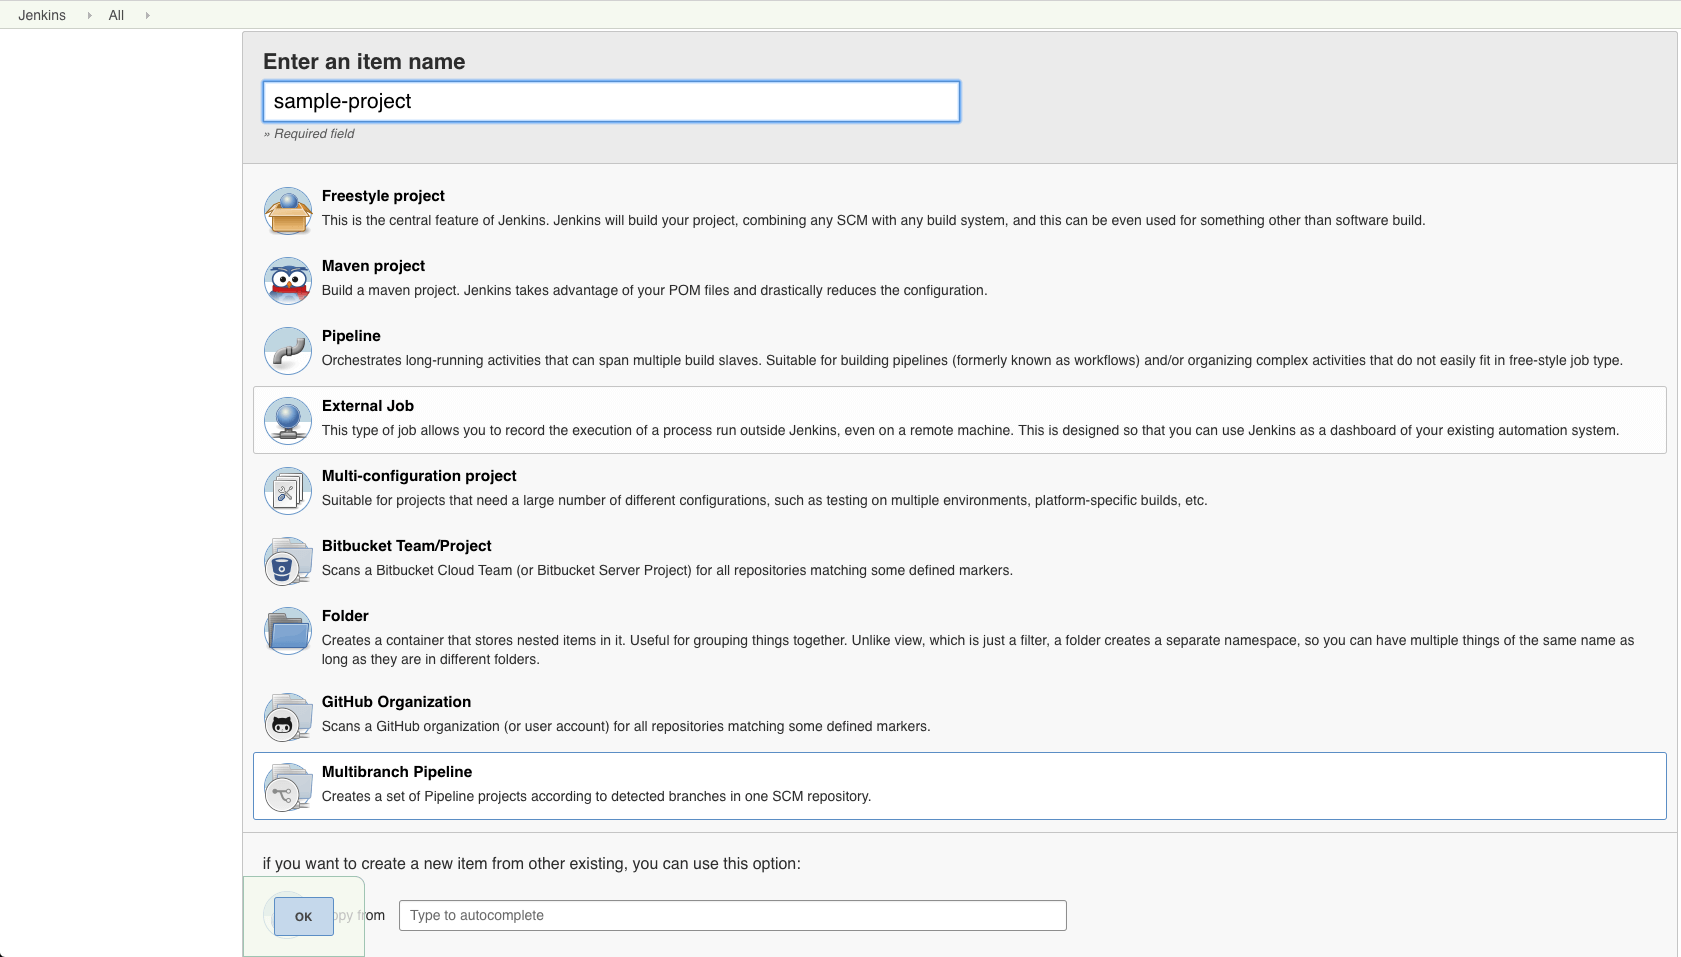
We will go briefly on this basic setup, pre-assuming that you are familiar with the basic Jenkins setup and installation of the basic plugins like the Git plugin.
Step 2: Fill-in your repository details
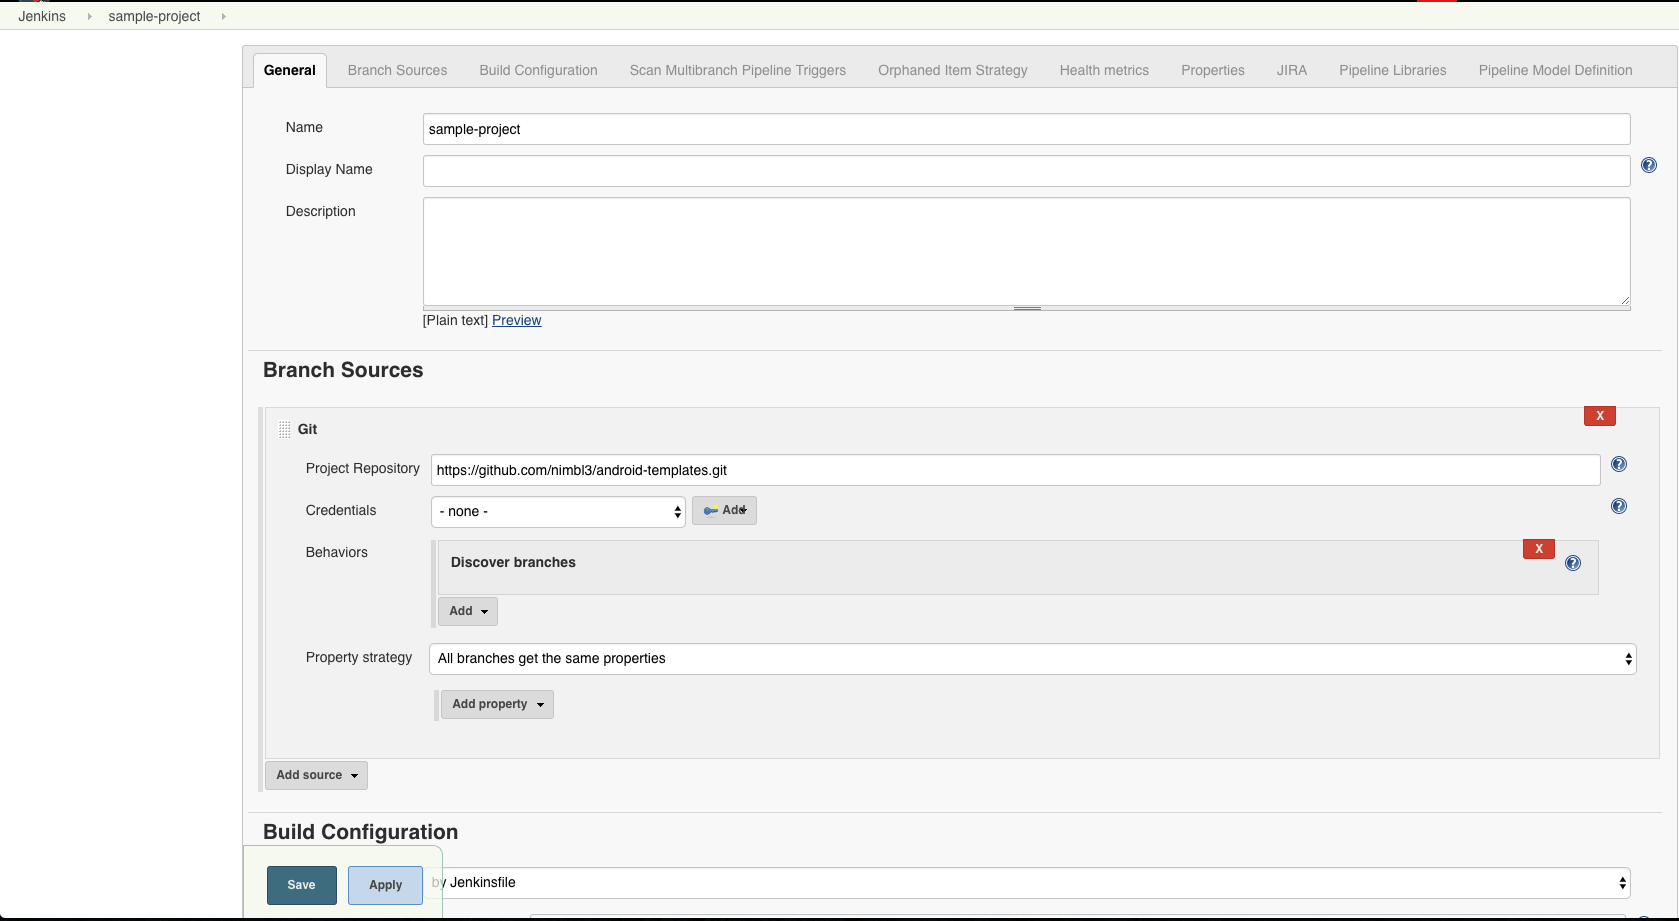
Upon saving this configuration, your Jenkins server will start scanning your repository. But it is likely nothing will happen as the configuration is not complete yet 🤒.
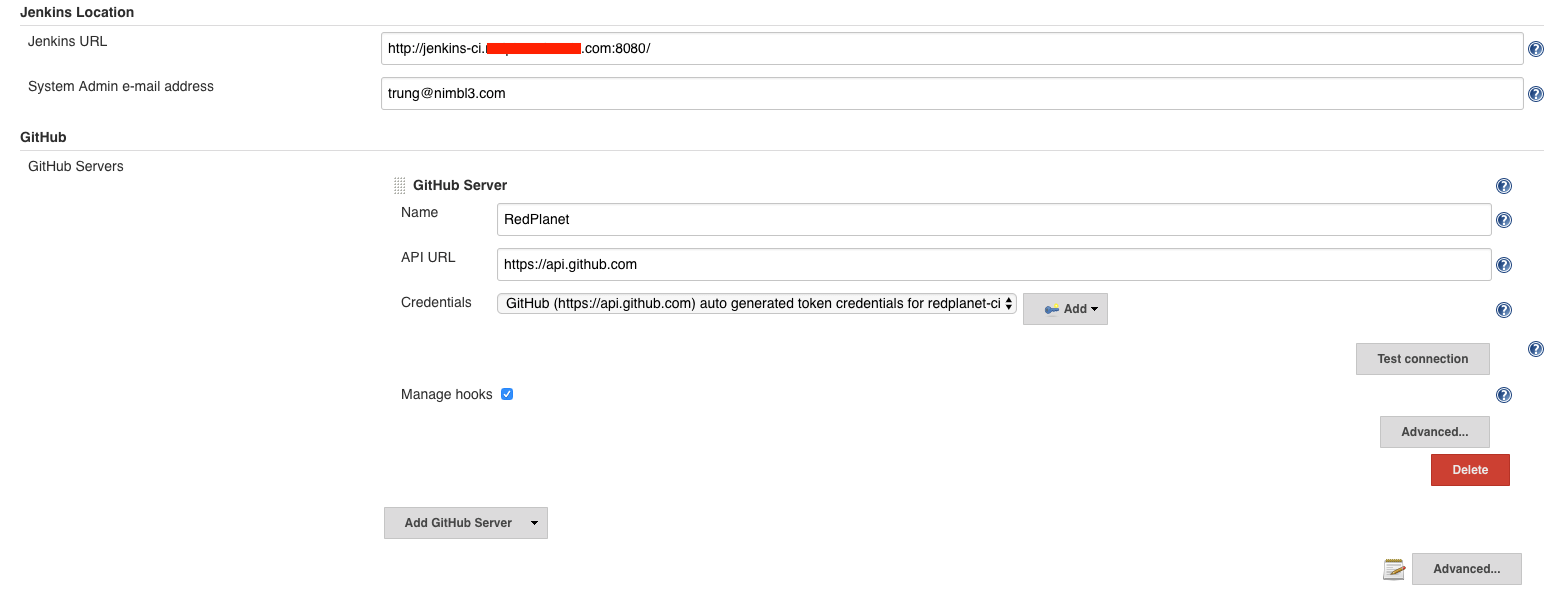
Step 3: Configure the webhook to listen to changes from a remote (Github is used in the example).
-
Go to
https://jenkins_url/configure. Find the field where you can define the Jenkins accessible address:Jenkins Location — Jenkins URL. This needs to be updated with the complete server public url including the port (after:)The latter should have been defined when starting up the Docker container for the Jenkins server (it defaults to8080). -
Fill in your Github repository information. Make sure that you check the checkbox
Manage Hookso that the plugins will do all the heavy lifting for you.
Tip 💡: if you don’t have any experience in networking (NAT) such as forwarding a local port to an external IP, this can easily be achieved by using a tool like ngrok. This tool is commonly used for web developments before.
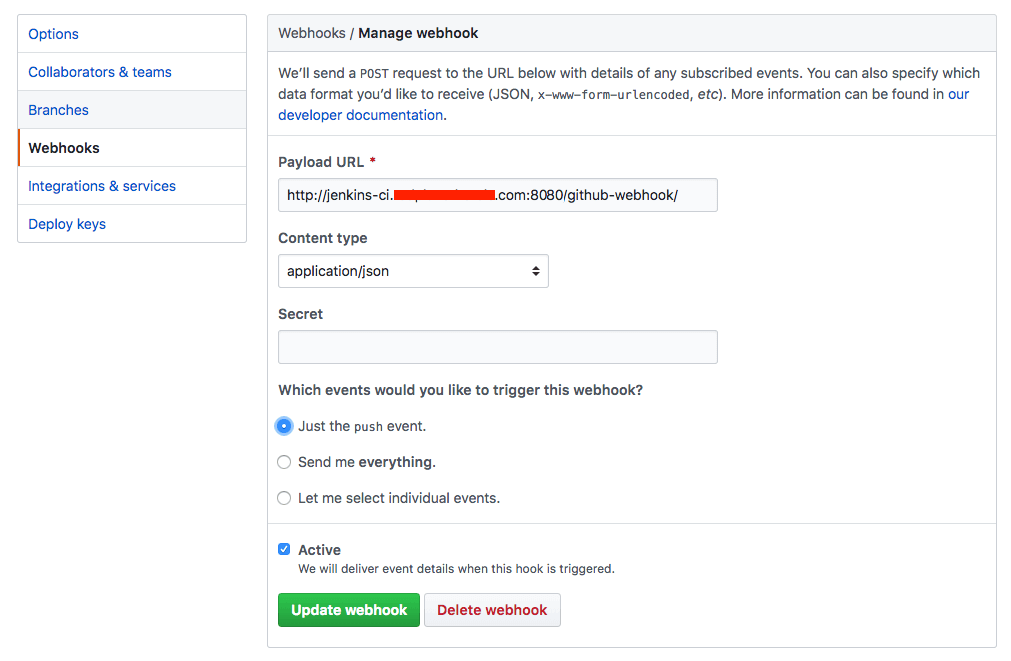
- Add the hook registration on Github: first, go to your Github repository
Settings->Webhooks->Add Webhook. Then registering the webhook payload to be sent tohttps://your_public_jenkins_site/github-webhook/and check for all the push events (you can also adjust to specify what exact events you want to receive as well).
Step 4: Add the Jenkinsfile to the project.
We will have a chore branch which will commit the Jenkinsfile into our current codebase as the major change of the migration. So first, let’s branch out from our main development branch and call this branch chore/setup-jenkins .
From the root of your repository, create a file name Jenkinsfile.
$ touch Jenkinsfile
This file is written in Groovy and defines the Pipeline Stages configuration. Two types of syntax can be used to declare the stages: Declarative Pipeline and Scripted Pipeline. Both can be mixed in the same file 💪.
I personally prefer and recommend to use the Declarative syntax as it is a more simplified and opinionated way to write on top of the pipeline workflow. Also, there are functions that are ready to be used, which is not the case with the Scripted syntax.
Here is a the corresponding Jenkinsfile configuration for the pipeline explained above:
pipeline {
  agent {
    node { label 'android' }                     (*)
  }

  stages {                                       (**)
    stage('Lint & Unit Test') {
      parallel {                                 (***)
        stage('checkStyle') {
          steps {
            // We use checkstyle gradle plugin to perform this
            sh './gradlew checkStyle'
          }
        }

        stage('Unit Test') {
          steps {
            // Execute your Unit Test
            sh './gradlew testStagingDebug'
          }
        }
      }
    }

    stage('UI Testing') {
      steps {
        script {                                  (****)
          if (currentBuild.result == null
              || currentBuild.result == 'SUCCESS') {
          // Start your emulator, testing tools
          sh 'emulator @Nexus_Emulator_API_24
          sh 'appium &'

          // You're set to go, now execute your UI test
          sh 'rspec spec -fd'
          }
        }
      }
    }

    stage('Deploy') {
      steps {
        script {
          if (currentBuild.result == null
              || currentBuild.result == 'SUCCESS') {
             if(env.BRANCH_NAME ==~ /master/) {
               // Deploy when the committed branch is master (we use fastlane to complete this)
               sh 'fastlane app_deploy'
          }
        }
      }
    }

}

  post {                                           (*****)
    always {
      archiveArtifacts(allowEmptyArchive: true, artifacts: 'app/build/outputs/apk/production/release/*.apk')

      // And kill the emulator?
      sh 'adb emu kill'
    }
  }

}
Here the explanation for some of the syntax used in this pipeline:
node {} (*): defines that all of these steps will be executed on a slave node agent which is hosted on the real machine environment (not a Docker container).
Tip 💡: Read on how to create and connect a slave node here (it’s simple!).
During this whole process, the bash profile used will be the same as the terminal session in which the JNLP connection was started. But it’s also possible to override those environment variables differently per slave in the node settings.
This technique is actually quite handy and useful, but also critical when running multiple slave agents on the same machine. In this case, we need to assign specific ports for each service (e.g. an Appium instance, emulator/simulators) to avoid conflicts on the same profile/ports.
Tip 💡: always make sure that all the gem/tools dependencies are pre-installed e.g: java | JAVA_HOME, node |npm |appium or ruby | gem | bundler | fastlane.
stages {} (**): all the Stages of this pipeline flow are enclosed in this node. So they have this general structure:
stages {
  stage('Stage 1') {
    steps { }
  }

  stage('Stage 2') {
    steps { }
  }

  etc..
}
parallel {} (***): this keyword declares a block of actions that will be executed in parallel. This is handy when you have multiple small jobs that can be done at the same time.
script {} (**): use a script block when you need to have a complex block of code that would be better to be expressed in the scripted way e.g. conditional checks.
This is handy when you want to check if a build has failed the previous step or when you need to retrieve the current branch name to apply extra action like in the deployment step.
if (currentBuild.result == null || currentBuild.result == 'SUCCESS')
post {} (*****): defines the steps that will be always performed after all the stages have been performed, whether successfully or not. Usually, this is where we archive all our Jenkins-generated artifacts (test report, built APKs, IPAs…) to a specific storage location, or cleanup the workspace, and close the emulator/simulator.
Tip 💡: more syntax information can either be found in the official Jenkins documentation. We also find this ref card useful as it’s a summarized version.
Step 5: Commit and push this branch to your remote and hope for the magical green screen to display 🤑 (not blue screen lol 😨) .
The final result when all the steps are passing through (check this out from the BlueOcean at https://your_jenkins_url/blue):
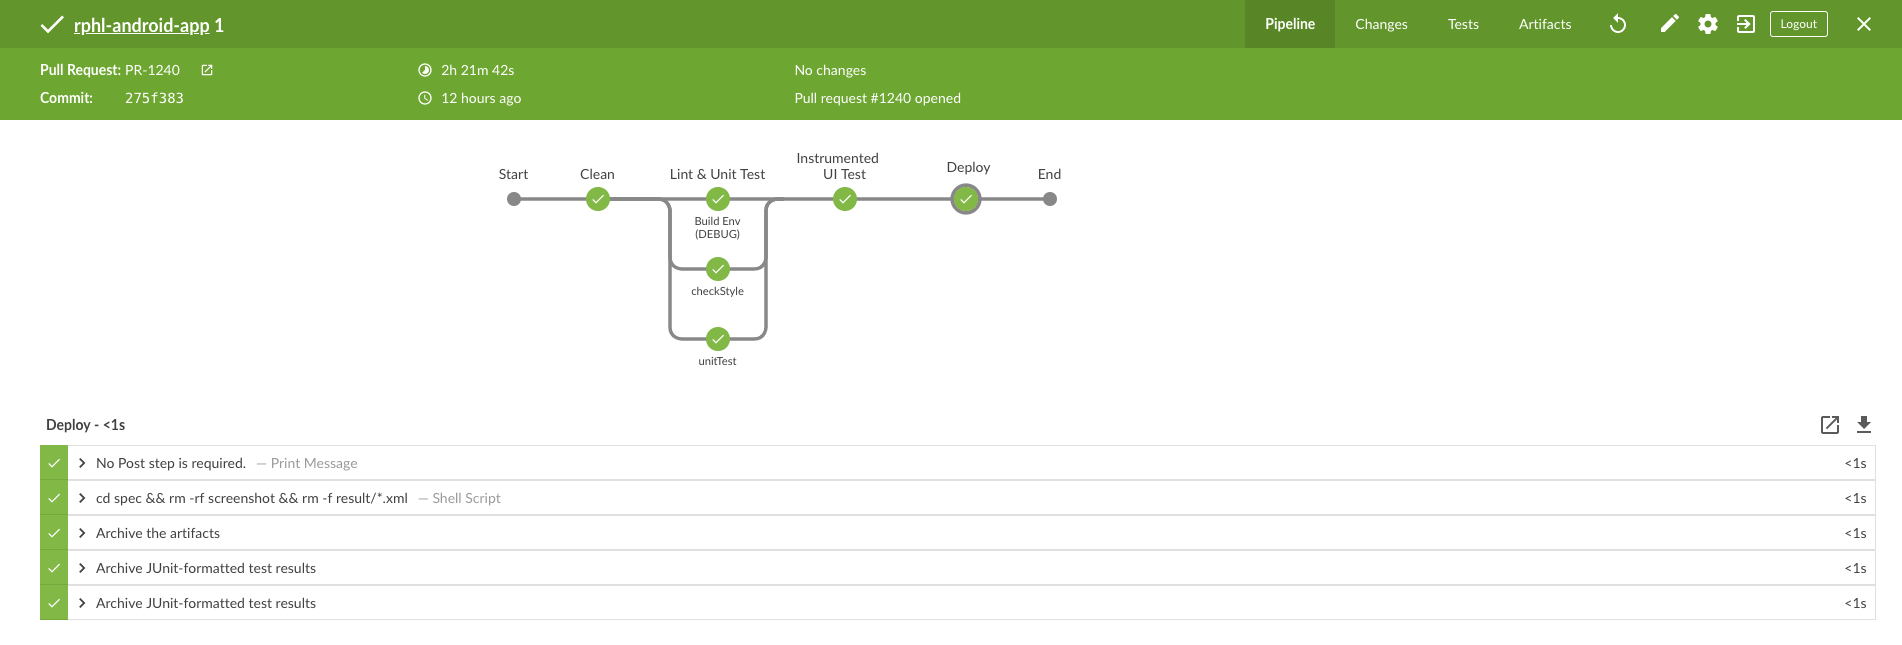
Et voilà!
Our Continuous Integration and Delivery system is sailing now ⛴. It will automatically scan, build, validate and deploy all the repository branches. Development and deployment now should now be done with more ease and confidence!
Note that setting the pipeline flow is not a silver bullet. There could be still some unforeseen issues when this system goes live. For instance, the amount of time it takes to complete the UI Testing (well…we run around 100 cases and it could take us nearly 2 hours to complete 1 round, which is CRAZY and unacceptable for TDD!). But in general, those issues can be partially resolved in various ways:
-
Increase the number of slaves running in parallel, and run them on the same machine to save resources (I will provide an in-depth guide on how to do this in the next post).
-
Execute the critical flow (unit tests and critical UI tests) to all the branch builds and run only a full cycle (complete test suite) when merging/doing a PR build.