
Throughout this post, I will be assuming that you’re already familiar with both Jenkins and Docker. If you are not, I encourage you to check out their respective websites and documentations.
Like many developers, our team at Nimble has been struggling with setting up an efficient workflow for mobile applications testing. Because testing is so deeply rooted in our culture, we persisted and figured out a better way.
Prior to using Jenkins, we used well-known Continuous Integration/ Continuous Delivery (CI/CD) providers such as Travis CI, Bitrise, Circle CI, etc. Unfortunately, using emulators on these platforms always remained a struggle. The main bottleneck is that the standard container instances specs are usually too limited. For instance, none of the aforementioned providers offers x86 emulator to enable hardware acceleration.
To leverage real hardware acceleration, we needed to host our own CI server. We chose Jenkins as the foundational piece of software for our automation workflow.
Jenkins is arguably the most well-known and used tool for running a CI/CD server. And with the recently-introduced BlueOcean plugin, pipelining the workload is easier than ever and Jenkins has a UI on par — or even better — than the service providers.
With little efforts, we managed to set up our own workflow and everything worked as expected.
Still, we were still very hesitant about hosting our own CI server. Setup time, maintenance overhead, and the difficulty to replicate the setup for new projects were pretty big concerns for us.
And then we thought of Docker 💡
Docker is a lightweight, open-source platform that helps build, ship, and run distributed applications on different platforms. While we use it extensively for web application development, we did not include it just yet in our toolbox for mobile development.
The very same things that make Docker shines for web development — its flexibility, ease of use, and mobility (moving containers through various environments/platforms) — could benefit to mobile application development.
The Fun Part
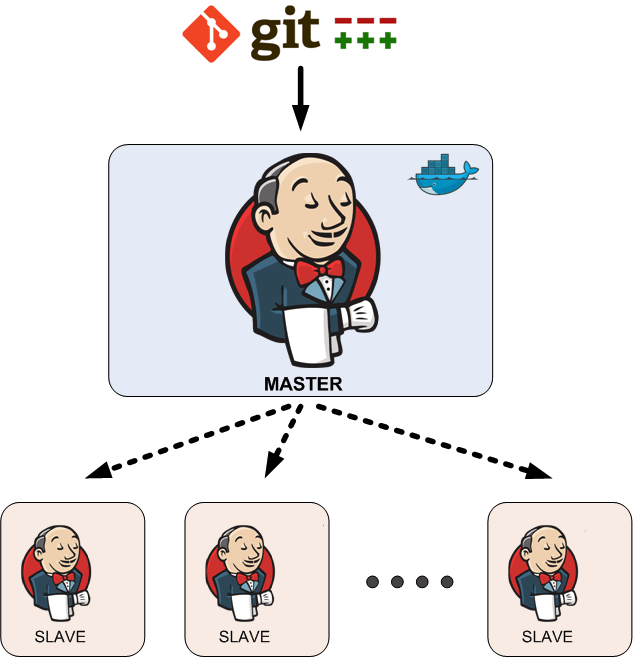
In this walkthrough, we’re going to deploy Jenkins with these architectural components:
-
Jenkins Master server with data: Java process, plugins, job definitions, artifact storage, etc.
-
Build Slave agents: machines that use the JNLP (Java Launch Network Protocol) to connect to the Jenkins master server.
Let’s get started 💻
Step 1: Install Docker
Simply follow the instruction in the Docker official site to get it installed (for this post, we are using the build for MacOS).
Upon successful installation, you should be able to see this tiny icon in the system menu tray:

To check if the setup is finished, open the Terminal and type:
$ docker ps
This command will print out all running containers; no container should be listed at the moment. By default, this command only shows the running containers; to see all available containers, use it with the flag --all or -a (in its short version).
Step 2: Pull the Jenkins image into Docker
Now we need to start creating our Jenkins-based Docker container, right?
Luckily for us, the Cloudbees foundation provides a Docker-based image of Jenkins on the Docker hub. Even sweeter, they also provide a separate image with the BlueOcean plugin. Things just got easier to start now!
So let’s pull the Jenkins image with BlueOcean installed to a docker container. Name it as you want. I’ll call it jenkins-master .
First, pull the image:
$ docker pull jenkinsci/blueocean
Then, create a container based on that image. We will keep the default settings such as the port 8080. If you want to use a different port, simply modify the port flag value -p 8085:8080.
$ docker run -p 8080:8080 --name=jenkins-master -i jenkinsci/blueocean
Or with the customized port:
$ docker run -p 8085:8080 --name=jenkins-master -i jenkinsci/blueocean
Then to check if our container is online:
$ docker ps
The above command should print out a list of the running containers. Your container should now be listed.

Give it a few seconds to boot up, then access your server via localhost:8080. You should now see that our Jenkins server is ready!
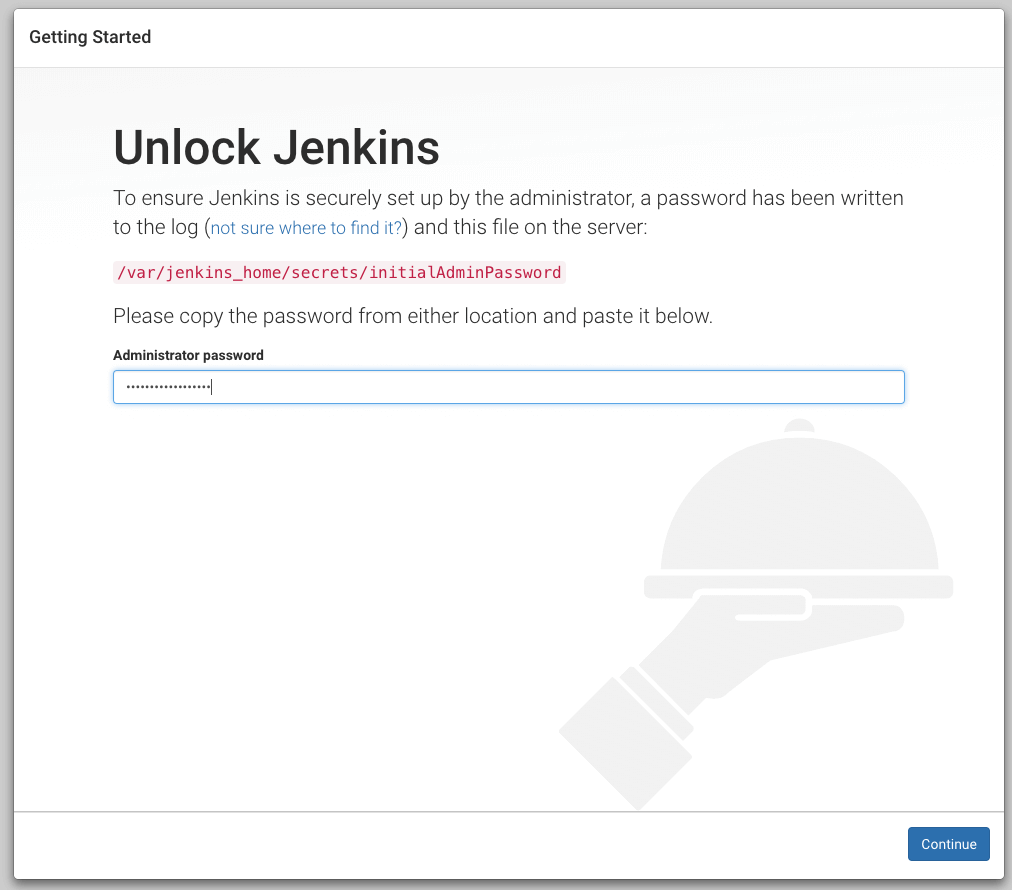
Before being able to access the Jenkins dashboard, we need to retrieve the administrator initial password. The easiest is to check the console log from Docker as the password has been printed out:
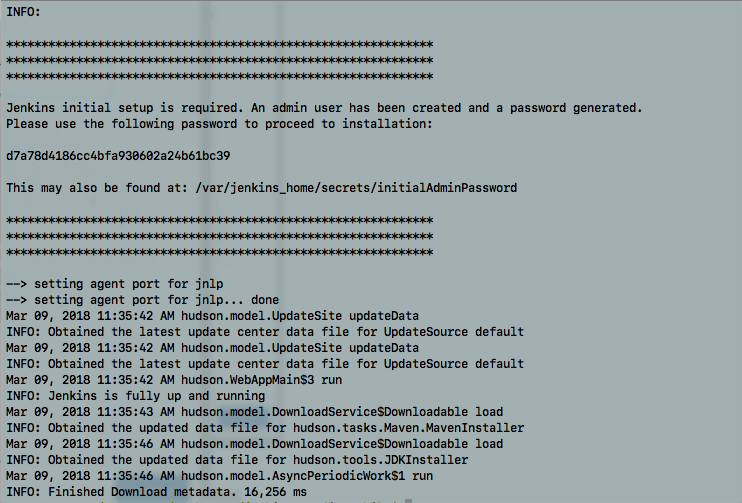
Grab the password and login.

Don’t grab your required plugins here just yet, trust me, move forward and you will find out why 🤓
Step 3: Persist the data
The setup of Jenkins is pretty straightforward as we can even pick all the plugins without any manual work involved. But when the server is reset, or simply when the Docker container is itself reset, all the configuration is entirely wiped out forcing you to re-do everything again 😱
Don’t believe it? Try to stop and start the container:
$ docker stop jenkins-master
$ docker start jenkins-master
This happens because we have not configured the data volume that will be used for persisting data yet. The data corresponds to everything that will be generated throughout the running process, including credentials, plugins data, repository configuration etc..
To persist data, there are several alternatives. For the purpose of this post, I chose to store the volume on the hosting machine’s file system. So it will be easy to inspect, manipulate the data as things go on. To achieve this, we first we need to remove the old container (because you cannot re-create the same container names jenkins-master):
$ docker rm jenkins-master
Then re-create a new container again. But this time, we will configure where the data will be mounted using the following flags -d -v $path/to/data (more details about the flags can be found here 🤓)
$ docker run -d -v my_workspace/jenkins-data:/var/jenkins_home -p 8080:8080 --name=jenkins-master -i jenkinsci/blueocean
To test if this worked properly — i.e. the data is persisted after restarting the Docker container — simply stop and start the docker container again. You should not be asked to type in the initial password again this time 🤑
Note that the data which is required by each initialized Jenkins server — now stored in the jenkins-data sub-directory — can easily be re-used by a new Jenkins instance and also backed-up!
Step 4: Initialize slaves — the essential elements
In our setup, the slaves, which are connected via the JNLP (Java Launch Network Protocol), will do the heavy lifting 🐌💪 .
Their responsibilities will be:
-
Building the mobile app package (in both iOS and Android).
-
Executing the unit tests and UI Testing on emulators.
-
Deploying the applications for distributions on platforms like Fabric for beta testing and the Play/App stores for product-ready releases.
-
Reporting the results back to the Jenkins Master server.
Setting up the slave is not hard. But the setup instructions required for mobile application testing will be discussed in a future post. For now, there is still some configuration work required on the Master server.
By default, the connections to the Slaves nodes— via the JNLP — use the port 50000 . But in order for this to work, we need to configure the Docker container to have this port open.
First, remove the old docker container:
$ docker rm jenkins-master
Then, create a new one with the desired extra port:
$ docker run -d -v my_workspace/jenkins-data:/var/jenkins_home -p 8080:8080 -p 50000:50000 --name=jenkins-master -i jenkinsci/blueocean
or with a customized port 49000 :
$ docker run -d -v my_workspace/jenkins-data:/var/jenkins_home -p 8085:8080 -p 49000:49000 --name=jenkins-master -i jenkinsci/blueocean
Unlike the steps to customize the HTTP port forwarding, the Jenkins server is already configured with an environment variable(JENKINS_SLAVE_AGENT_PORT) to define the port for JNLP connections (by default, 50000 ). In order to change this setting to the customized port that we want( 49000 ), we can just pass the value using flag --env or -e (short version).
So our setup now looks like this (don’t forget to remove the old container before re-creating this new container):
$ docker run -d -v my_workspace/jenkins-data:/var/jenkins_home -p 8085:8080 -p 49000:49000 --name=jenkins-master --env JENKINS_SLAVE_AGENT_PORT=49000 -i jenkinsci/blueocean
Note that it’s also possible change this settings via the Jenkins Dashboard:
https://your-jenkins-url:port/configureSecurity-> Agents -> Change the default fixed port

Now you should have master-slave connections established successfully. If you have some prior experience with using a master-slave node architecture with Jenkins, go ahead and start creating as many slaves as you want. if you’re not familiar with this setup, keep on reading and I’ll show you da way in the last part of the post 😆
Step 5: So are we done?
Almost there for the master-slave node setup, but you might have wondered:
So do we still need to start the docker container up by ourselves every time the host machine get restarted?
With this current setup, the answer is YES. But this can easily be resolved as Docker provides us with a simple way to configure this container to be automatically started when the Docker application starts.
Just add the flags --restart or -r flag with your desired option (check the documentation here). As I want the Docker container to always restart, I use: --restart always .
So the complete set up for our Dockerised Jenkins is:
$ docker run --restart always -d -v my_workspace/jenkins-data:/var/jenkins_home -p 8085:8080 -p 49000:49000 --name=jenkins-master --env JENKINS_SLAVE_AGENT_PORT=49000 -i jenkinsci/blueocean
Try to restart the whole hosting machine, you should be able to access your Jenkins server after the reset with the data persisted!
In the next post, we will dive into the setup of a project with the Pipeline model using the BlueOcean plugin. We will also show you how to delegate the work to the Slaves, therefore achieving the automation for our CI/CD development cycle 🚀