
Introduction
Phoenix 1.7 is here! The new version introduces several new exciting features that improve the overall experience for both users and developers. This article discusses the most notable features, such as a unified HTML rendering approach across the Controller and LiveView, built-in support for TailwindCSS, Verified Routes, and LiveView Streams.
Unified HTML rendering approach
Let’s start with the major change that impacts the application the most: the unified HTML rendering approach. Previously, the way to render components or partials among controller-based templates (also called Dead Views by José Valim and Chris McCord) and LiveView differed.
Normally in controller templates, we need to use the render function then pass the view module and assign it to the component:
<%= render(MyAppWeb.UserView, "user_card", user: user) %>
Meanwhile, LiveView uses a function component syntax.
<.user_card user={@user} />
Now Phoenix 1.7 supports function components to render both controller-based and LiveView-based components. Phoenix.View is removed and replaced with the new Phoenix.Template to unify the rendering approach.
The deprecation of Phoenix.View and rendering all components with the function-based approach allows components and layouts to be shared among controllers and LiveView modules.
# The following syntax can be used in both
# controller and LiveView templates
<.user_card user={@user} />
The new project structure
Phoenix introduces a new directory structure corresponding to changes in component rendering.
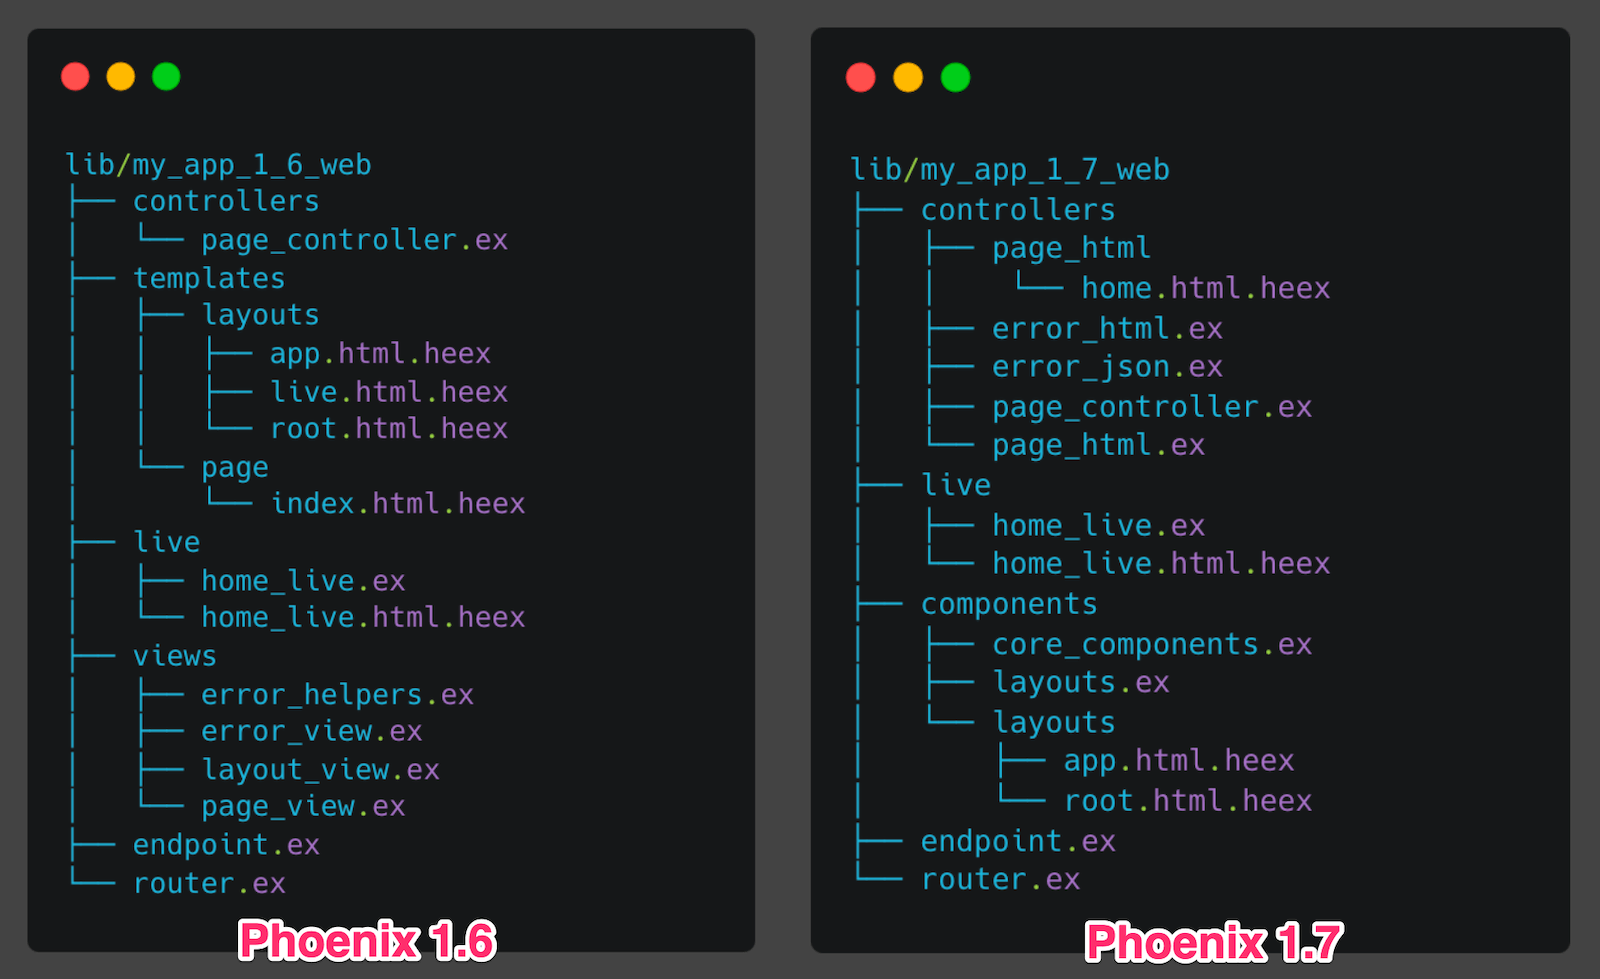
The first noticeable change is the new structure no longer includes the views and templates directories due to the deprecation of Phoenix.View. Instead, view modules follows the naming convention *_html.ex or *_json.ex , depending on the response format, and are located within the controllers directory alongside templates.
The new structure also introduces the components directory, which contains components and layouts that can be used across controller and LiveView templates. For a new project, Phoenix will generate core_components.ex module, which contains the base UI for the application, such as modal, or button.
Built-in support for Tailwind CSS
After creating a Phoenix 1.7 application, it will already be set up to utilize Tailwind CSS as the default styling tool. It means that you can quickly launch the Phoenix server and start customizing your content using Tailwind utility classes. And there is no need to set up any extra tools like the Node.js or Webpack, everything works out of the box.
Tailwind CSS is a utility-first CSS framework which makes it easier to create shared components. By using Tailwind, the application’s stylings are in the same place as markup.
Instead of:
.content {
  display: flex;
  align-items: center;
  background-color: white;
  padding: 0.25rem;
}
<div class="content"></div>
We can write:
<div class="flex items-center bg-white p-1"></div>
This approach eliminates the need to name a class, group the same concern in the same file, and improve the code portability. We can copy the entire component to a different project without worrying about different ways of structuring CSS or custom abstractions.
We can define our custom styles inside tailwind.config.js.
module.exports = {
  theme: {
    colors: {
      'white': '#ffffff'
    }
  }
}
We can also use arbitrary properties.
<div class="bg-[#ffffff]"></div>
Note that we can still combine Tailwind CSS with the traditional stylesheet by using @apply directive (even though the official documentation does not recommend doing it):
.content {
  @apply flex items-center bg-white p-1;
}
Example of creating a shared component
attr :navigate, :any, required: true

def back(assigns) do
    ~H"""
    <.link navigate={@navigate} class="white">
      Back
    </.link>
    """
end
The purpose of this component is to display a back button. It receives one attribute, which is a path.
<.back navigate={~p"/posts"} />
It can be reused throughout the project. When updates are necessary, only a single file needs to be edited. Additionally, because we use Tailwind CSS, all the stylings are editable within a function. Multiple classes can be combined without worrying about the CSS specificity.
Verified Routes
Verified Routes is the new way to reference a valid path in templates or controllers, replacing the need to call route helpers. Previously, we would need to use the route helper and provide arguments to return a single path.
We can explicitly define a path inside the ~p sigil with Verified Routes and rely on compiler checks.
# Generate a route with the helper
MyWeb.Router.Helpers.user_path(@conn, :index)
# => "/users"

# Verified route is here!
~p"/users"
# => "/users"
The first obvious benefit of Verified Routes is the convenient way of calling without the need to provide conn and action parameters. Moreover, the verified routes provide a compile-time check to ensure the routes are valid and exist. Phoenix will warn you at compilation time if any given routes are invalid or missing.
For example, the index screen contains a link to the dashboard but there is a typo in the given route.
<.link href={~p"/dashboardd"}>Dashboard</.link>
When starting the application, Phoenix will warn there is an invalid route.
$ mix phx.server
warning: no route path for MyWeb.Router matches "/dashboardd"
  lib/my_web/components/layouts/_header.html.heex:2: MyWeb.Layouts._header/1
Up to this point, you may find Verified Routes are the clear winner compared to routes helper, but we only cover the basic usage. In the next section, we will go through more practical use cases that will suit all needs in your project.
Params in Verified Routes
Params can be given as part of the path the same way as string interpolation.
~p"/users/#{@user.id}"
# => "/users/1"

~p"/articles/#{@article.slug}"
# => "/articles/elixir-is-awesome"
You can omit the key if the given params derive Phoenix.Param. By default, the key is id.
~p"/users/#{@user}"
# => "/users/1"
However, it is possible to specify a custom key for the struct or schema.
# Specify custom key in the schema
defmodule Article do
    @derive {Phoenix.Param, key: :slug}
    schema "articles" do
        # ...
    end
end
# Now you can omit the slug key!
~p"/articles/#{@article}"
# => "/articles/elixir-is-awesome"
Query string in Verified Routes
You can manually add a query string to the route.
~p"/users?active=true&search=#{@keyword}"
# => "/users?active=true&search=John"
Another approach is to provide the query string as a map or keyword list.
~p"/users?#{%{active: true, search: @keyword}}"
# => "/users?active=true&search=John"

~p"/users?#{[active: true, search: @keyword]}"
# => "/users?active=true&search=John"
Set Up Verified Routes
The new project generated with Phoenix 1.7 generator supports Verified Routes out-of-the-box!
If your project uses a previous version of Phoenix, you will need to make some modifications to your codebase to enable this feature.
Here are the step-by-step instructions:
Update your web application module, lib/my_app_web.ex:
# Add static_paths function
def static_paths, do: ~w(css fonts images js favicon.ico robots.txt)

def controller do
  quote do
    # ...
    # Remove the `Router.Helpers` alias

    # Add verified_routes function, it is defined below.
    unquote(verified_routes())
  end
end

defp view_helpers do
  quote do
    # ...
    # Add verified_routes function, it is defined below.
    unquote(verified_routes())
  end
end

# Define verified_routes function
def verified_routes do
  quote do
    use Phoenix.VerifiedRoutes,
      endpoint: MyAppWeb.Endpoint,
      router: MyAppWeb.Router,
      statics: MyAppWeb.static_paths()
  end
end
Update the static path of Plug.Static in lib/my_app_web/endpoint.ex:
plug Plug.Static,
    at: "/",
    from: :myapp,
    gzip: false,
    only: MyAppWeb.static_paths() # Update the static path here.
Add verified_routes to conn_case. This will allow your tests to use Verified Routes:
using do
    quote do
        use MyAppWeb, :verified_routes

        # ...
    end
end
LiveView Streams
With LiveView Streams, you can now handle updates, inserts, and deletes for large datasets without storing and reloading the entire collection on the server like you would with a normal LiveView assignment.
To create a stream, call the stream/3 function, passing in the socket, the stream name, and the initial dataset:
def mount(_params, _session, socket) do
  {:ok, stream(socket, :books, Library.all_books())}
end
Then, in the template, instead of accessing a @books assign, you can use @stream.books.
If the collection’s contents change, you can use stream_insert/4 or stream_delete/3 to populate changes to the stream.
This not only helps to improve performance but also reduces the amount of re-rendering required to make changes on the front-end layer.
Migration from version 1.6
We upgraded a few of our Phoenix 1.6 (and even 1.5) apps to a newer version, and the process went smoothly. We did not come across any issues along the way.
Chris McCord has created this handy document on how to upgrade from Phoenix 1.6 to 1.7: https://gist.github.com/chrismccord/00a6ea2a96bc57df0cce526bd20af8a7
Conclusion
The Phoenix 1.7 update brings a lot of impressive new features and enhancements, particularly for developers working with LiveView. This release solidifies Phoenix’s standing as one of today’s most admired Web frameworks.
If you are unfamiliar with the Phoenix Framework, now is the perfect time to begin learning it with this official getting starting guide. You also can check our ready to go elixir template and our elixir code conventions.