
Introduction
Dynamic Type is an accessibility feature on iOS and macOS. The feature allows the user to set a text scale that is applied to the whole device, updated automatically. The scale can be larger than the default for aiding users with lower vision ability or smaller to fill the screen with more data at once.
UIKit and SwiftUI’s default font includes this feature internally, all the developer has to do is set the font on the label with a font style.
textLabel.font = .preferredFont(forTextStyle: .body)
However, not all applications use the same generic font. The goal is to show custom font with dynamic typing capability which will need some work.

Adding Custom Font
Start by choosing a font to use in the project. It is advisable to use a font with multiple weights for conveying different meanings in the application.
Fonts can be downloaded from a free platform such as Google Fonts.
Drag the font files to the Xcode project. The best practice is to create a folder Font and a subfolder for each font family.
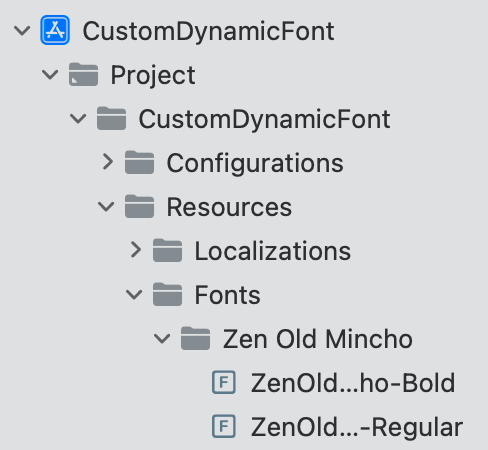
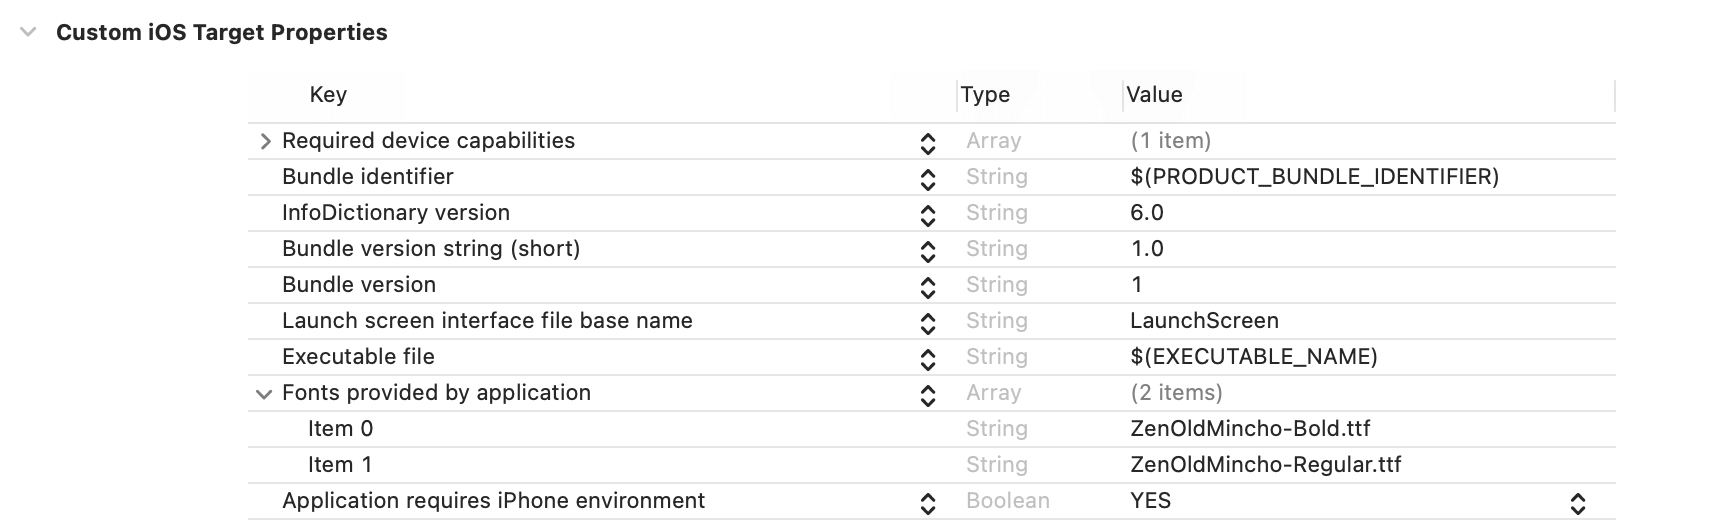
Open the main target’s Info.plist and add the key UIAppFonts as an array. Inside the array, add the file name and extension for each of the fonts included.
The font files are now imported to the project and can be used by creating an instance of UIFont.
textLabel.font = UIFont(name: "Font-Name", size: UIFont.labelFontSize)
However, the tricky part is that the string "Font-Name" is currently unknown. To find this variable, the following method can be used to print out all of the fonts’ names and pick the one that was imported.
for family in UIFont.familyNames.sorted() {
    let names = UIFont.fontNames(forFamilyName: family)
    print("Family: \(family) Font names: \(names)")
}

// Family: Zen Old Mincho Font names: ["ZenOldMincho-Regular", "ZenOldMincho-Bold"]
Using Custom Dynamic Typing Helper
The easiest way to use a custom font in the Swift project is to assign the font directly to the label.
textLabel.font = UIFont(name: "ZenOldMincho-Regular", size: UIFont.labelFontSize)
Now the custom font should display correctly on the screen. There are a couple of ways to adjust the font size on the simulator.
Adjusting Text Size on iOS
Accessibility Settings
Launch the Settings app on the device or a simulator. Navigate to Accessibility > Display & Text Size > Larger Text. The slider will change the font size for the system.
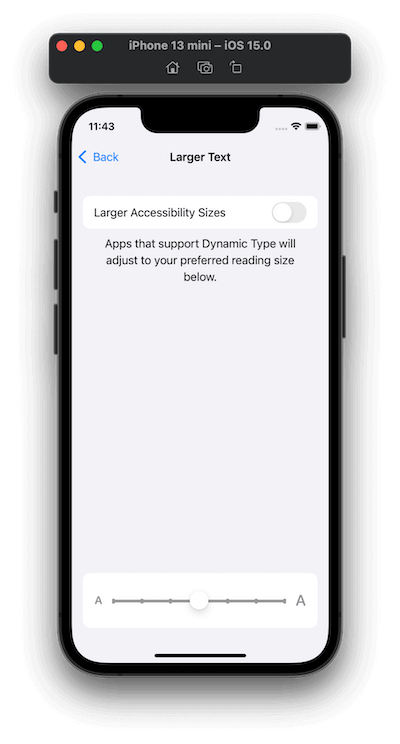
💡 Changing the text size will not cause any app to launch but the layout will be remade.
⚙️ This is for iOS 15, other iOS versions will have a slight difference but the option should be searchable with
Text SizeorLarger Text.
Xcode Environment Overrides
On Xcode, after successfully running the app on a simulator, find the Debug Area. The Debug Area contains a button with the symbol of toggles. This button should bring up the Environment Overrides menu for the simulator. The text size can be adjusted with the slider for Dynamic Type.
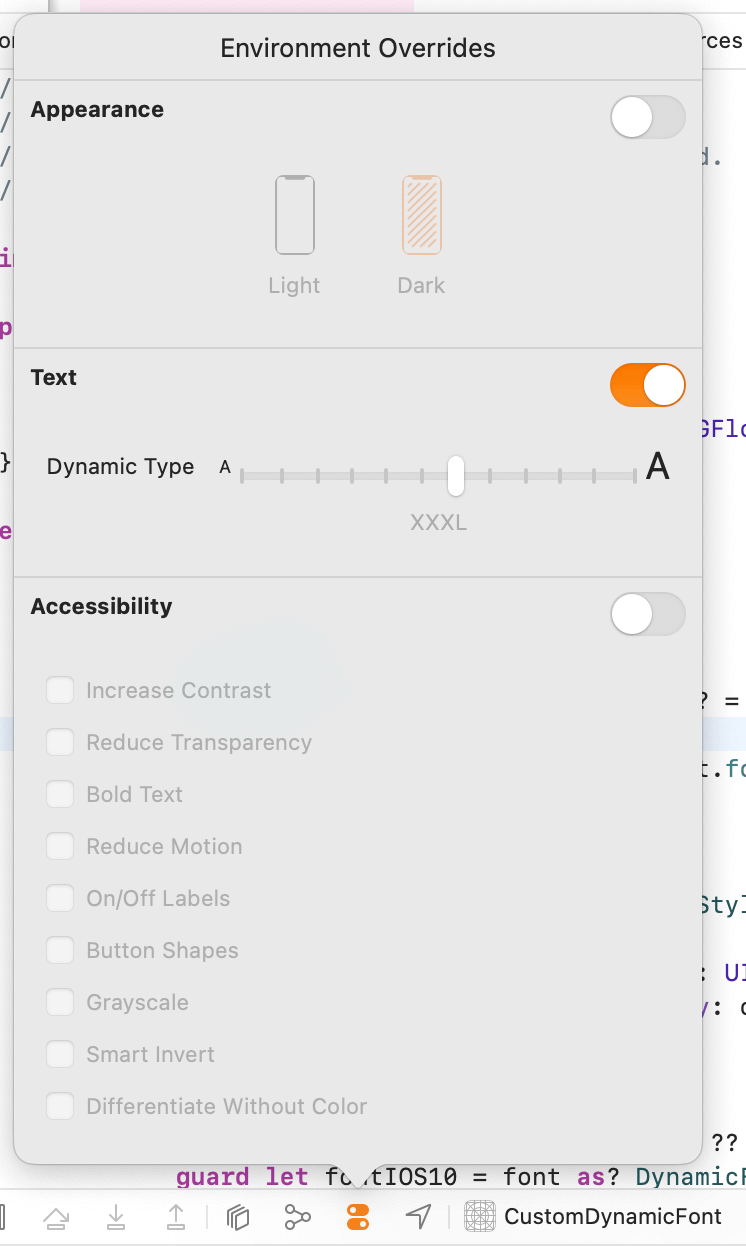
💡
Environment Overrideswill override the simulator’s settings and will return the most recent settings on the simulator when turned off.
Relaunching the application with the device’s setting changed should show the new text in the new scale. However, it is not possible to change the font size when the application is running. What is missing is a scaling tool. Modify the code for setting the label’s text as follows:
let customFont = UIFont(name: "ZenOldMincho-Regular", size: UIFont.labelFontSize)!
label.font = UIFontMetrics.default.scaledFont(for: customFont)
label.adjustsFontForContentSizeCategory = true
UIFontMetrics helps support scaling font automatically as the device’s text size setting is changed. Testing with Accessibility Settings and Environment Overrides should now work.
To leverage UIFontMetrics capability, we introduce a helper:
func customFont(
    _ font: DynamicFont,
    forTextStyle style: UIFont.TextStyle,
    overrideFontSize: UIContentSizeCategory? = nil
) -> UIFont?
Why Helper
On top of adding another layer to UIFontMetrics, the helper serves as the gateway for the functionalities that the application can do. The list of the requirements includes:
- All custom fonts can be used within one function.
- Text sizes are distinguishable by their text style (ie: body, title, caption, etc.).
- Text size can be overridden with in-app settings.
As a bonus, the helper will work differently in iOS 10 and iOS 11 due to UIFontMetrics being introduced in iOS 11.
First, we create a protocol for choosing a font: DynamicFont.
protocol DynamicFont {
    func fontName() -> String
    func fontSize(style: UIFont.TextStyle) -> CGFloat
}
This protocol will serve as a blueprint for a particular font family. fontSize takes a TextStyle as an argument and returns the font size when the text size from the device’s setting is the default. Occasionally, this is the font size that appears on the design prototype.
The example of DynamicFont for our demo is as follows.
enum ZenOldMincho: DynamicFont {
    case regular
    case bold

    func fontName() -> String {
        switch self {
        case .regular: return "ZenOldMincho-Regular"
        case .bold: return "ZenOldMincho-Bold"
        }
    }

    func fontSize(style: UIFont.TextStyle) -> CGFloat {
        switch style {
        case .largeTitle: return 34.0
        case .title1: return 28.0
        case .title2: return 22.0
        case .title3: return 20.0
        case .headline: return 18.0
        case .body: return 17.0
        case .callout: return 16.0
        case .subheadline: return 15.0
        case .footnote: return 13.0
        case .caption1: return 12.0
        case .caption2: return 11.0
        default: return 17.0
        }
    }
}
This is all the setup needed. The function customFont can be implemented as follows.
extension UIFont {
    static func customFont(
        _ font: DynamicFont,
        forTextStyle style: UIFont.TextStyle,
        overrideFontSize: UIContentSizeCategory? = nil
    ) -> UIFont? {
        guard let customFont = UIFont(name: font.fontName(), size: font.fontSize(style: style)) else { return nil }
        let scaledFont: UIFont
        let metrics = UIFontMetrics(forTextStyle: style)
        return scaledFont = metrics.scaledFont(
            for: customFont, compatibleWith: UITraitCollection(
                preferredContentSizeCategory: overrideFontSize ?? .unspecified
            )
        )
    }
}
This function uses UIFontMetrics.scaledFont to scale a font with a particular text style and return the scaled font as output. UITraitCollection(preferredContentSizeCategory:) is used for overriding the system’s text size setting. The resulting dynamic font can be used just like other fonts.
textLabel.font = .customFont(ZenOldMincho.regular, forTextStyle: .body)
overridedLabel.font = .customFont(ZenOldMincho.bold, forTextStyle: .headline, overrideFontSize: .small)
iOS 11
The above version of the helper can be used right away on iOS 11. UILabel should have adjustsFontForContentSizeCategory set to true to allow automatic updates when the system changes text size.
label.adjustsFontForContentSizeCategory = true
label.font = .customFont(ZenOldMincho.regular, forTextStyle: .body)
When using the overrideFontSize feature of customFont, adjustsFontForContentSizeCategory can cause the font size to change after system’s setting changed. It is advisable to turn automatic update off when overriding system’s font size.
label.adjustsFontForContentSizeCategory = false
label.font = .customFont(ZenOldMincho.regular, forTextStyle: .body, overrideFontSize: .small)
This block of code can be called every time the value of the overriding size changes.
iOS 10
UIFontMetrics.scaledFont is only available on iOS 11 and later. For iOS 10, the font scale will need to be provided manually for each text style and size category, as well as updating the font when the system’s text size changes.
Font Scale
Introduce a new protocol:
protocol DynamicFontIOS10 {
    func font(for style: UIFont.TextStyle, sizeCategory: UIContentSizeCategory) -> UIFont?
}
This protocol will be adopted by a DynamicFont.
extension ZenOldMincho: DynamicFontIOS10 {
    func font(for style: UIFont.TextStyle, sizeCategory: UIContentSizeCategory) -> UIFont? {
        guard let style = ZenOldMincho.fontSizeTable[style],
              let size = style[sizeCategory]
        else { return nil }
        return UIFont(name: fontName(), size: size)
    }
}
For the font ZenOldMincho, the size for a particular text style and the size category is read from the dictionary fontSizeTable. The fontSizeTable will look something like the following:
extension ZenOldMincho {
    static let fontSizeTable: [UIFont.TextStyle: [UIContentSizeCategory: CGFloat]] = [
        .headline: [
            .accessibilityExtraExtraExtraLarge: 23.0,
            .accessibilityExtraExtraLarge: 23.0,
            .accessibilityExtraLarge: 23.0,
            .accessibilityLarge: 23.0,
            .accessibilityMedium: 23.0,
            .extraExtraExtraLarge: 23.0,
            .extraExtraLarge: 21.0,
            .extraLarge: 19.0,
            .large: 17.0,
            .medium: 16.0,
            .small: 15.0,
            .extraSmall: 14.0
        ],
        .body: [
            .accessibilityExtraExtraExtraLarge: 53.0,
            .accessibilityExtraExtraLarge: 47.0,
            .accessibilityExtraLarge: 40.0,
            .accessibilityLarge: 33.0,
            .accessibilityMedium: 28.0,
            .extraExtraExtraLarge: 23.0,
            .extraExtraLarge: 21.0,
            .extraLarge: 19.0,
            .large: 17.0,
            .medium: 16.0,
            .small: 15.0,
            .extraSmall: 14.0
        ]
    // Fill with all text style
}
💡 Scaling can also be done with algebraic equations but most fonts are not designed or are not ideal to be scaled with numbers alone. The best practice is to design for every accessibility size for each of the text styles in the app.
The function customFont will need to be modified to accommodate iOS 10 scalings.
static func customFont(
    _ font: DynamicFont,
    forTextStyle style: UIFont.TextStyle,
    overrideFontSize: UIContentSizeCategory? = nil
) -> UIFont? {
    guard let customFont = UIFont(name: font.fontName(), size: font.fontSize(style: style)) else { return nil }
    let scaledFont: UIFont
    if #available(iOS 11.0, *) {
        let metrics = UIFontMetrics(forTextStyle: style)
        scaledFont = metrics.scaledFont(
            for: customFont, compatibleWith: UITraitCollection(
                preferredContentSizeCategory: overrideFontSize ?? .unspecified
            )
        )
    } else {
        let sizeCategory = overrideFontSize ?? UIApplication.shared.preferredContentSizeCategory
        guard let fontIOS10 = font as? DynamicFontIOS10,
              let customFontIOS10 = fontIOS10.font(for: style, sizeCategory: sizeCategory)
        else { return customFont }
        scaledFont = customFontIOS10
    }
    return scaledFont
}
We create the logic branch for greater iOS 11 and anything lower. The logic for iOS 11 remains the same while iOS10 and lower will use the new DynamicFontIOS10.font(:) function.
Automatically Update Text Size
Currently, the application will show the correct font only when it is first loaded. The page will need to set the font for each component every time the text size changes. This can be done by listening to the NotificationCenter’s notification UIContentSizeCategory.didChangeNotification.
protocol DynamicFontController {

    func setUpContentSizeNotification(disposeBag: DisposeBag)
    func updateFonts(notification: Notification)
}

extension DynamicFontController where Self: UIViewController {

    func setUpContentSizeNotification(disposeBag: DisposeBag) {
        NotificationCenter.default.rx.notification(UIContentSizeCategory.didChangeNotification, object: nil)
            .withUnretained(self)
            .take(until: rx.deallocated)
            .subscribe { owner, value in
                owner.updateFonts(notification: value)
            }
            .disposed(by: disposeBag)
    }
}
Apply this protocol to any view controller that should support automatic text size update and call setUpContentSizeNotification in the viewDidLoad.
class IOS10DynamicFontController: UIViewController, DynamicFontController {
		let label = UILabel()
		let disposeBag = DisposeBag()
    override func viewDidLoad() {
        super.viewDidLoad()
        setUpContentSizeNotification(disposeBag: disposeBag)
				label.adjustsFontForContentSizeCategory = true
    }
    func updateFonts(notification _: Notification) {
			label.font = .customFont(ZenOldMincho.regular, forTextStyle: .body)
		}
}
💡 For a non
RxSwift, do not forget to callNotificationCenter.removeObserverin thedeinit.
The font size will update automatically as the system’s text size changes.
SwiftUI
SwiftUI has a view modifier specifically for modifying the font.
.font(.custom(name, size: size))

Text("Hello").font(.custom("ZenOldMincho-Regular", size: 16.0))
This method can be used by itself without a wrapper but it will not update the font when the system’s text size updates.
Updating Font Size
To allow font size updating, a new view modifier will be used to account for the change in the system’s text size.
If the project is purely SwiftUI, the existing declaration of customFont(_ font: DynamicFont, forTextStyle style: UIFont.TextStyle, overrideFontSize: UIContentSizeCategory? = nil) -> UIFont? can be ignored.
The declaration of an equivalent SwiftUI method is:
extension View {
    func scaledFont(
        font: DynamicFont,
        forTextStyle style: UIFont.TextStyle,
        overrideFontSize: ContentSizeCategory? = nil
    ) -> some View {
        return modifier(
            ScaledFont(
                name: font.fontName(),
                size: font.fontSize(style: style),
                overrideFontSize: overrideFontSize
            )
        )
    }
}
This creates a new function modifier for any view. The modifier struct ScaledFont will be attached to the parent view.
The declaration of ScaledFont is:
struct ScaledFont: ViewModifier {
    @Environment(\.sizeCategory) var sizeCategory
    var name: String
    var size: CGFloat
    var overrideFontSize: ContentSizeCategory?
    func body(content: Content) -> some View {
		    let scaledSize = UIFontMetrics.default.scaledValue(for: size)
		    return content.font(.custom(name, size: scaledSize))
    }
}
This struct watches for changes in sizeCategory and updates the font when there is a change. The font size is calculated by UIFontMetrics for automatic font scaling.
With the modifier scaledFont we can change the font on any view with a similar signature. The resulting view will update the font size as the system’s settings change.
Text("Hello")
		.scaledFont(font: ZenOldMincho.bold, forTextStyle: .headline)
Overridable
The current implementation of ScaledFont: ViewModifier does not include overriding the font size within the application.
To allow overriding, UIFontMetrics.scaledValue(for:, compatibleWith:) will be used. This is the same in UIKit implementation; however, converting from ContentSizeCategory to UIContentSizeCategory, to satisfy scaledValue’s input, is only possible for iOS 14 and above.
Modify the code for ScaledFont.body to:
func body(content: Content) -> some View {
    let scaledSize = UIFontMetrics.default.scaledValue(for: size, compatibleWith: UITraitCollection(
        preferredContentSizeCategory: UIContentSizeCategory(overrideFontSize)
    ))
    return content.font(.custom(name, size: scaledSize))
}
overrideFontSize can be nil and will return the system’s default.
Using the modifier scaledFont, we can now override the text size.
Text("Hello")
		.scaledFont(font: ZenOldMincho.bold, forTextStyle: .headline, overrideFontSize: .extraLarge)
Conclusion
Swift is continuously evolving to allow easy implementation of accessibility to improve user’s quality of life. The helper functions presented in this blog can be conveniently integrated into existing and new projects.
Dynamic Font will allow power users to see more data with a glance as well as help users with vision problems to use the application smoothly. Dynamic Font is one of many accessibility features that developers can embrace to improve their applications.
The source code for this project is available on our repository.
References
Scaling custom fonts automatically with Dynamic Type