At the time of writing, k3s is one of the three most popular installable Kubernetes distributions on the CNCF Landscape, with almost 14k Github stars since its launch in early 2019, quickly selected as the number 1 new developer tool of 2019 by Stackshare.
In this post, I will demonstrate how to build a 4-node Kubernetes cluster on Google Compute Engine (GCE) with the help of Terraform and k3sup utility.
Prerequisites
This post requires some prior hands-on experience on Terraform syntax, its CLI commands, and how to provision a simple VM instance on Google Compute Engine.
If you don’t have any prior experience, don’t sweat it. You can get started with Quickstart using a Linux VM (GCE) and Get Started - Google Cloud (Terraform)
Introduction
What is k3s and how it differs from k8s?
If you are familiar with k8s, you may agree that it’s not simple to set up a “best practices” k8s cluster which needs:
- Separate master nodes - which run the control plane - from worker nodes - which run the workload.
- A separate cluster for
ectddatabase to guarantee its High Availability. - Ideally, a separate node to run the Ingress Controller so that the cluster can handle incoming requests easily.
A lot of instances are needed to set up a production-ready k8s cluster. It’s not only hard to set up a staging and production environment on a remote VM, you will also have to replicate it on your local machine for development.
That is where k3s can simplify things for us.
k3s is a highly available and certified Kubernetes distribution designed with simplicity at its core. It is packaged as a single < 40MB binary that reduces the dependencies and time to set up a production-ready cluster. With a simple command, you can have a cluster ready in under 30 seconds 🚀.
Since it requires very low resources, it’s possible to run a cluster on machines having as little as 512MB of RAM.
All external dependencies have been optimized to make everything as lightweight as possible:
- SQLite replaces
etcdas the database. - Traefik is the default Ingress Controller.
How wonderful is that with some minimal RAM resource instances, we can run a k3s cluster with all Kubernetes features 🤩.

We are going to stick with the above architecture which includes 1 Server Node (or Master Node) and 3 Agent Nodes.
Note that while k8s do not allow to schedule a Pod on the control plane without tainting, master nodes on k3s are schedulable, and thus your workloads can be launched directly on them.
Installation (on MacOS)
k3s can be set up with the following:
$ curl -sFL https://get.k3s.io | sh -
Like a piece of cake, right? You can check the readiness of the node by k3s kubectl get node command
$ k3s kubectl get node
NAME         STATUS   ROLES    AGE   VERSION
nimbleblog   Ready    <none>   69s   v1.18.6+k3s1
However, what if we have multiple nodes, and we want to add one more node to the cluster? We have to ssh to that node and install it with the curl command every time 😭.
That’s where k3sup comes in to make this easier!
k3sup /ˈkɛtʃ.ʌp/
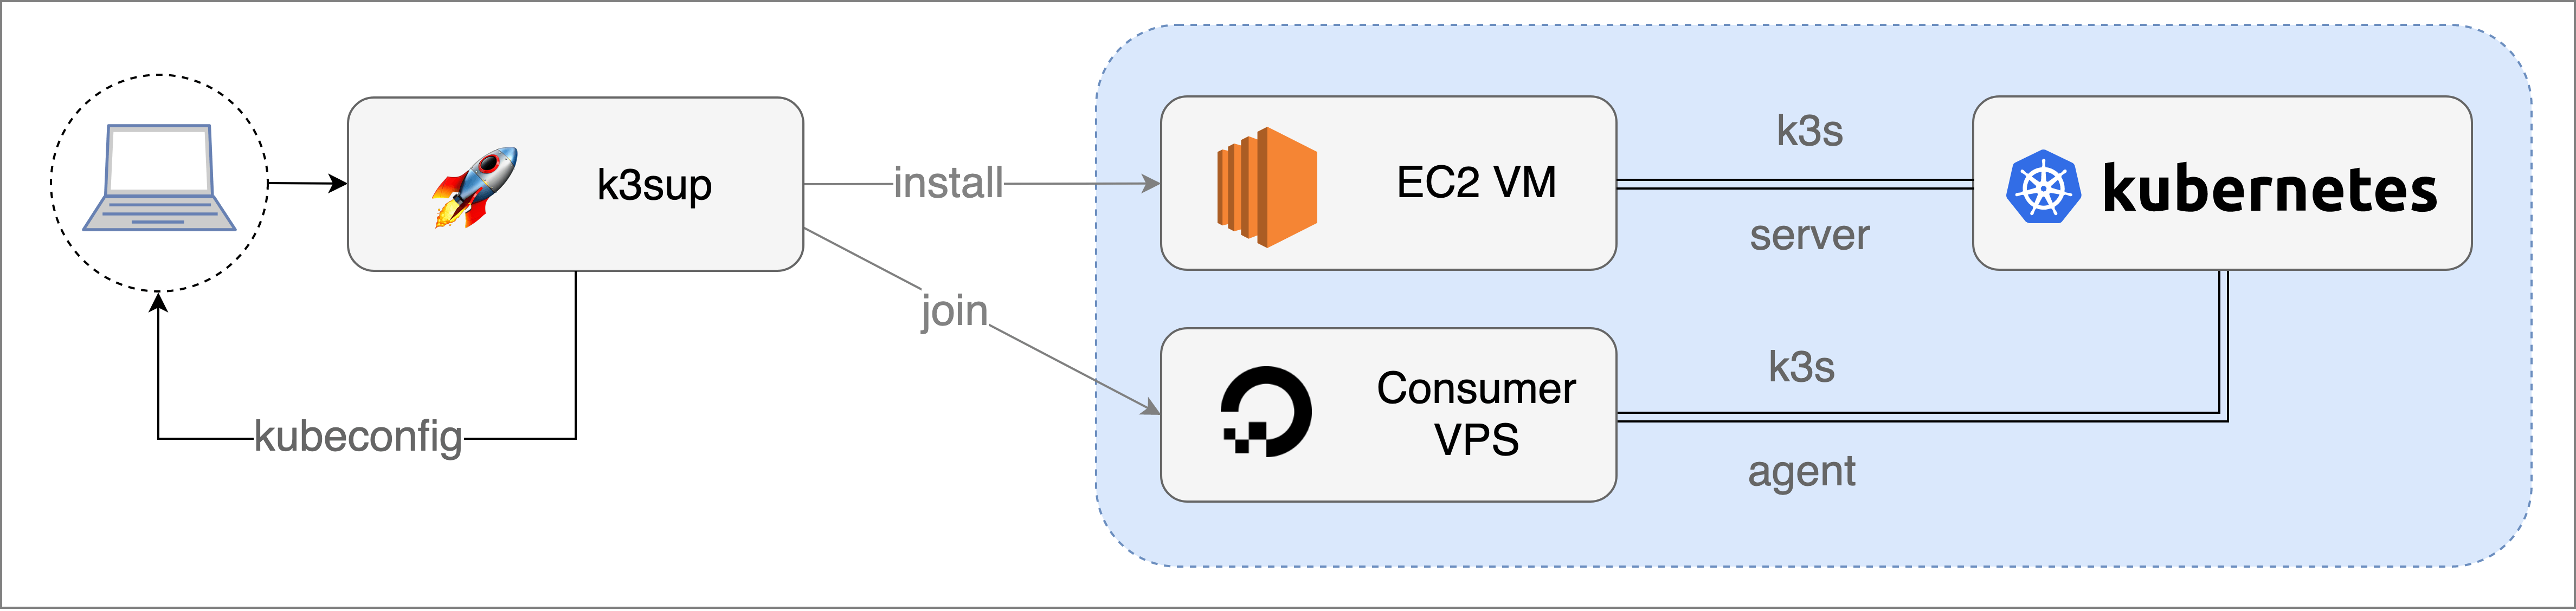
k3sup is a lightweight utility to get from zero to production-ready cluster with k3s on any local or remote VM. All you need is ssh access and the k3sup binary. The rest will be taken care including:
- Bootstrapping a Kubernetes cluster with
k3sonto any VM withk3sup install. - Fetching the
KUBECONFIGfrom an existingk3scluster to your local environment. This configuration file allows you to control any Kubernetes component via thekubectlcommand from your local environment. - Building an HA and multi-master cluster (in the scope of this blog post, we only need one master cluster).
- Quickly joining worker nodes into existing
k3scluster withk3sup join.
Installation
With some simple steps, k3sup executable is ready to use:
$ curl -sLS https://get.k3sup.dev | sh
$ sudo install k3sup /usr/local/bin/
$ k3sup version
_    _____
| | _|___ / ___ _   _ _ __
| |/ / |_ \/ __| | | | '_ \
|   < ___) \__ \ |_| | |_) |
|_|\_\____/|___/\__,_| .__/
                     |_|
Version: 0.9.5
Git Commit: 4a33103616dddf045b79aaffbc0a847a3fa59592
After a successful installation, we can simply combine it with Terraform to set up our cluster.
Terraform
Infrastructure as Code (IaC) has allowed us to automate most operations related to Cloud Provider resources. Terraform is the most popular player among the IaC solutions.
Terraform is a tool for building, changing, and versioning infrastructure safely and efficiently.
With Terraform, we can easily set up VM instances in a few lines of code. The most significant advantage of Terraform is that we can quickly change to use other Cloud Providers with minimal changes.
Here is an example of Terraform code:
provider "google" {
  project = <google_project_id>
  region = <region>
  zone = <availability_zone>
}

resource "google_compute_instance" "vm_instance" {
  name         = "terraform-instance"
  machine_type = "f1-micro"

  boot_disk {
    initialize_params {
      image = "debian-cloud/debian-9"
    }
  }

  network_interface {
    network = google_compute_network.vpc_network.name
    access_config {
    }
  }
}
That’s all you need to create a ready-to-use VM instance on GCE. It cannot be more simple 🤩.
Project Setup
Google Cloud Platform (GCP) Project
In the scope of this blog post, we are not focusing on how to set up a GCP Project with Terraform, so for your reference, you may want to check this tutorial.
Once a GCP Project is set up, we can fill the setup project id, region and availability zone values in main.tf file.
provider "google" {
	project = <google_project_id>
	region = <region>
	zone = <availability_zone>
}
SSH configuration
Since k3sup requires an SSH key to access to a VM instance to do its job, we need to generate an SSH key and save the configuration into an SSH config file (~/.ssh/config).
$ gcloud compute config-ssh
By default, the SSH key is generated in ~/.ssh/google_compute_engine.
Google Cloud Firewall Rules
The k3s server requires the port 6443 to be accessible by the nodes. To achieve that, we have to create a firewall rule and apply it to the VM instances with the tag k3s .
resource "google_compute_firewall" "k3s-firewall" {
	name = "k3s-firewall"
	network = "default"
	allow {
		protocol = "tcp"
		ports = ["6443"]
	}
	target_tags = ["k3s"]
}
Master node
In this step, we will provision a master node.
resource "google_compute_instance" "k3s_master_instance" {
  name         = "k3s-master"
  machine_type = "n1-standard-1"
  tags         = ["k3s", "k3s-master"]

  boot_disk {
    initialize_params {
      image = "debian-9-stretch-v20200805"
    }
  }

  network_interface {
    network = "default"

    access_config {}
  }

  provisioner "local-exec" {
    command = <<EOT
            k3sup install \
            --ip ${self.network_interface[0].access_config[0].nat_ip} \
            --context k3s \
            --ssh-key ~/.ssh/google_compute_engine \
            --user $(whoami)
        EOT
  }

  depends_on = [
    google_compute_firewall.k3s-firewall,
  ]
}
Terraform provides us with local-exec for invoking local executable after the master node has been created. We will use it to run k3supinstall with these params:
-
--ip: master node public IP address -
--ssh-key: generated ssh key from the previous step
🤚 Note that local-exec will run the command on our local machine, not the VM instance.
Worker Nodes
After successfully provisioning the master node, we need to associate the 3 worker nodes into the same cluster as the master node with the help of k3sup’s join command.
resource "google_compute_instance" "k3s_worker_instance" {
  count        = 3
  name         = "k3s-worker-${count.index}"
  machine_type = "n1-standard-1"
  tags         = ["k3s", "k3s-worker"]

  boot_disk {
    initialize_params {
      image = "debian-9-stretch-v20200805"
    }
  }

  network_interface {
    network = "default"

    access_config {}
  }

  provisioner "local-exec" {
    command = <<EOT
            k3sup join \
            --ip ${self.network_interface[0].access_config[0].nat_ip} \
            --server-ip ${google_compute_instance.k3s_master_instance.network_interface[0].access_config[0].nat_ip} \
            --ssh-key ~/.ssh/google_compute_engine \
            --user $(whoami)
        EOT
  }

  depends_on = [
    google_compute_firewall.k3s-firewall,
  ]
}
🤚 Note that to join worker nodes to the same cluster as the master node, we have to pass --server-ip params with the value of the master node’s public IP address.
Terraform Apply
Finally, we have a complete and production-ready main.tf file. For your reference, you can check out this gist for the final main.tf file
Now, we can verify and apply it with Terraform 🚀
$ terraform init

$ terraform plan

$ terraform apply
After provisioning the master node, k3sup will automatically save locally a kubeconfig file in the same directory of main.tf file, which feeds the configuration for kubectl command.
google_compute_instance.k3s_master_instance (local-exec): Saving file to: /Users/namtx/nimblehq/deployment/terraform/kubeconfig
And voilà, we have succeeded to set up a 4-node k3s cluster in a few easy steps.
$ kubectl get nodes
NAME         STATUS  ROLES   AGE   VERSION
k3s-master   Ready   master  103s  v1.18.6+k3s1
k3s-worker-0 Ready   <none>  43s   v1.18.6+k3s1
k3s-worker-2 Ready   <none>  42s   v1.18.6+k3s1
k3s-worker-1 Ready   <none>  10s   v1.18.6+k3s1
Wrapping up
With the combination of k3sup and Terraform, we can easily provision a production-ready Kubernetes cluster that can run on any VMs, Cloud Providers, or even on a Raspberry Pi.
Take it further
In the following posts, I’ll show you how to integrate Let’s Encrypt for the Ingress Controller and set up Google’s domain into a k3s cluster with the help of cert-manager.